
Why do digital marketing beginners need to build and own their websites?
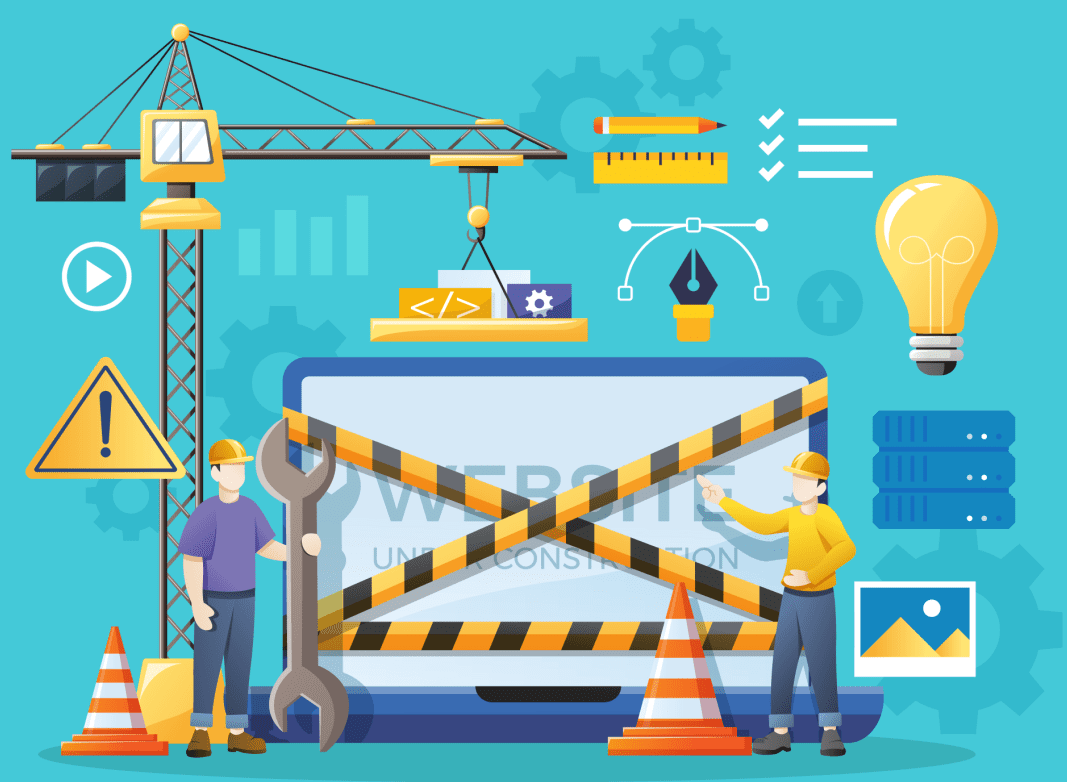
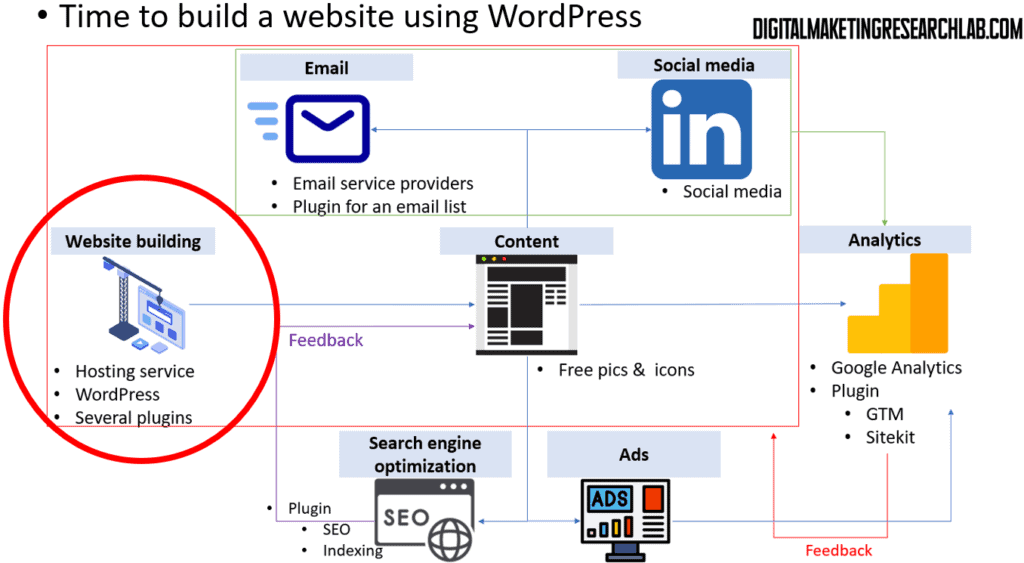
We have learned the basics of digital marketing and a website. Now we will learn about other digital tools that can work with a website. Before we move on to the next parts, let’s learn and build your website first that will work as the hub for your digital marketing tools.
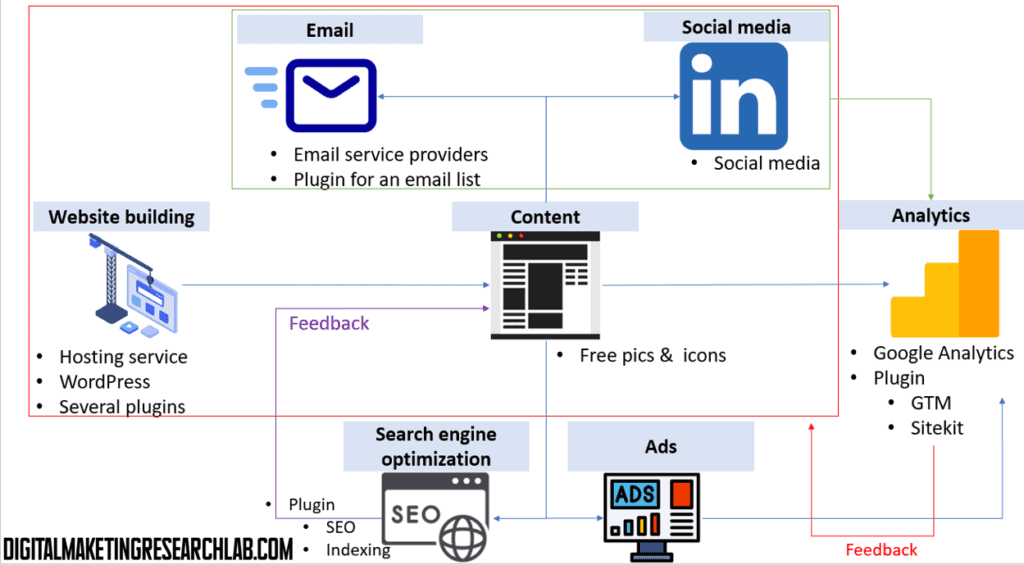
As this website is designed to help college students and beginners to understand and utilize digital marketing, we may have a question: Why do digital marketing beginners need to build and own their websites? The first appropriate answer might be that ‘without the experience of connecting your website with other digital marketing elements, it’s hard to grasp a big frame of digital marketing.’ If you have read some digitial marketing text book, can you picture the relations among digital marketing tools without the figure below? Fragmented chapters without clear connections in many textbooks simply frustrate beginners.
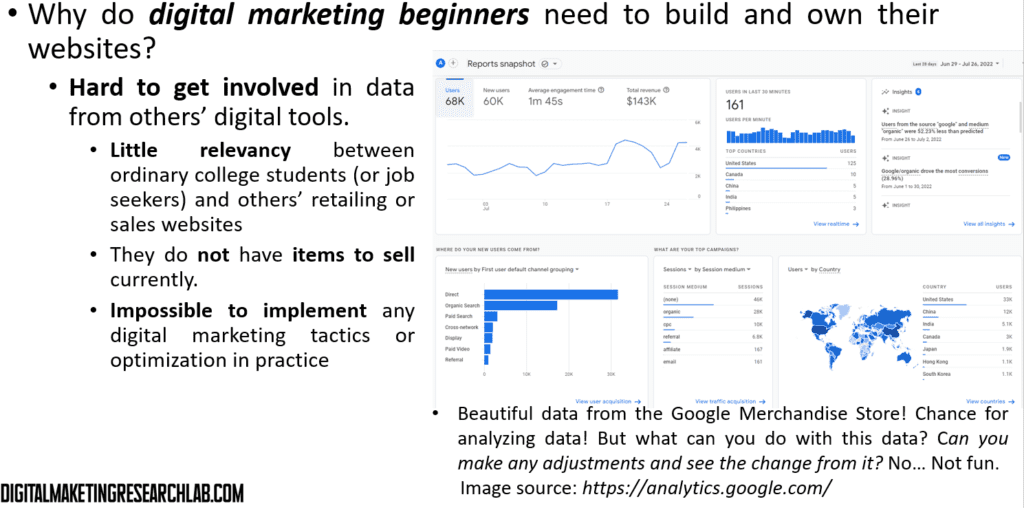
The second answer might be that ‘it is hard to get involved in data from others’ digital tools’. The dataset is not from the digital marketing from learners but from the industry, so there is little relevance between ordinary college students (or job seekers) and others’ retailing websites. Many entry-level digital marketing learners do not have items to sell currently. So those learners can’t implement any digital marketing tactics or optimization with the external dataset in practice.
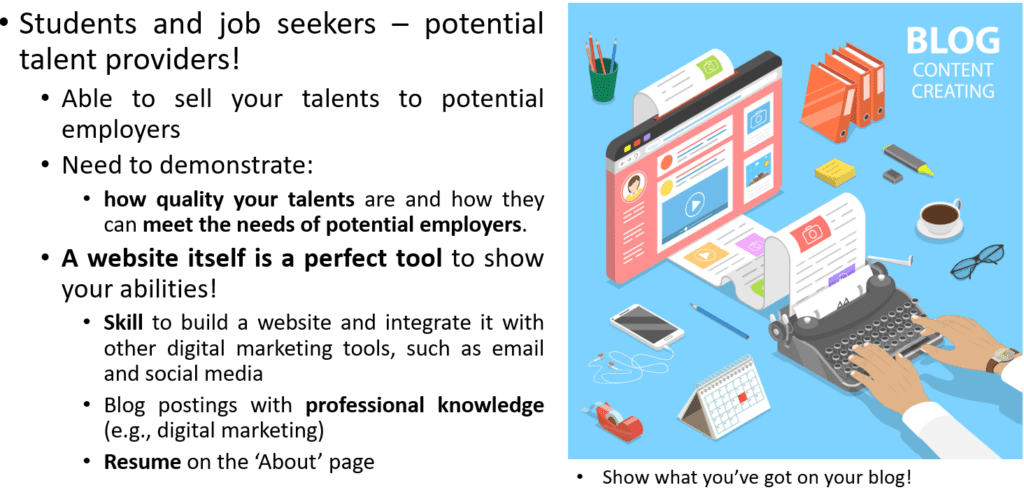
If you are college students or job seekers, you may not any products and services currently. However, you are potential talent providers! So, you can sell your talents to potential employers soon. To be successful in the job market, you need to demonstrate how quality your talents are and how you can meet the needs of potential employers.
In this sense, a website itself is a perfect tool to show your abilities! It can prove your skill to build a website and integrate it with other digital marketing tools, such as email and social media. Blog postings with professional knowledge (e.g., digital marketing) demonstrate that you have the right knowledge for the job your want to land. Your resume on the ‘About’ page publicizes 24/7 how you are well qualified for the job
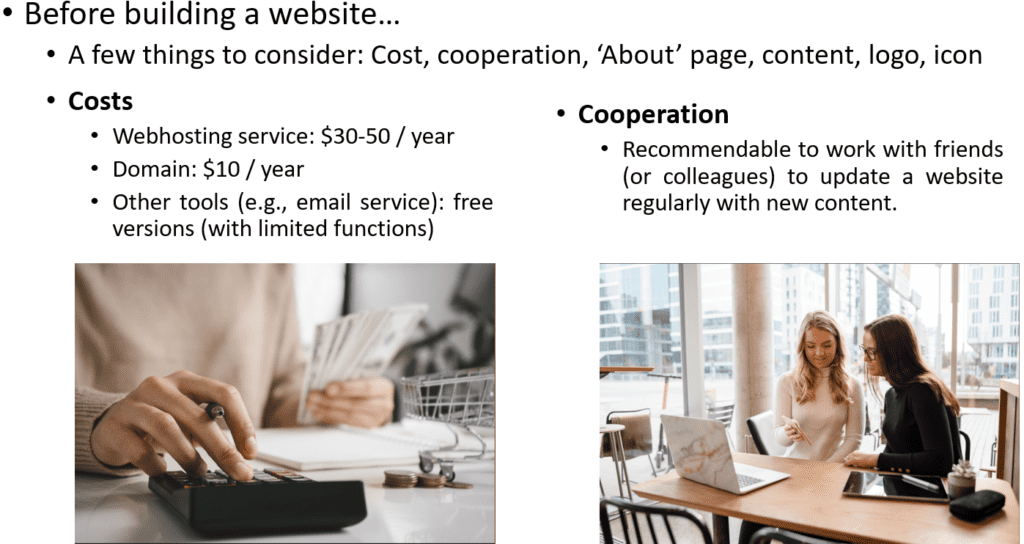
Before building your webpage, there are a few things to consider: Cost, cooperation, ‘About’ page, content, logo, icon, and so on.
Building a website takes some money to purchase services such as a webhosting service ($30-50 / year) and a domain service ($10 / year). However, except for that, you can take advantage of other tools (e.g., email service) or free versions of plugins
Managing a website or a blog needs consistency, such as regular updates, but this is not such an easy job. So, it is recommendable to work with friends (or colleagues) to update a website regularly with new content.
What to prepare before building a website?
Next, you will think of content that you will put on your website.
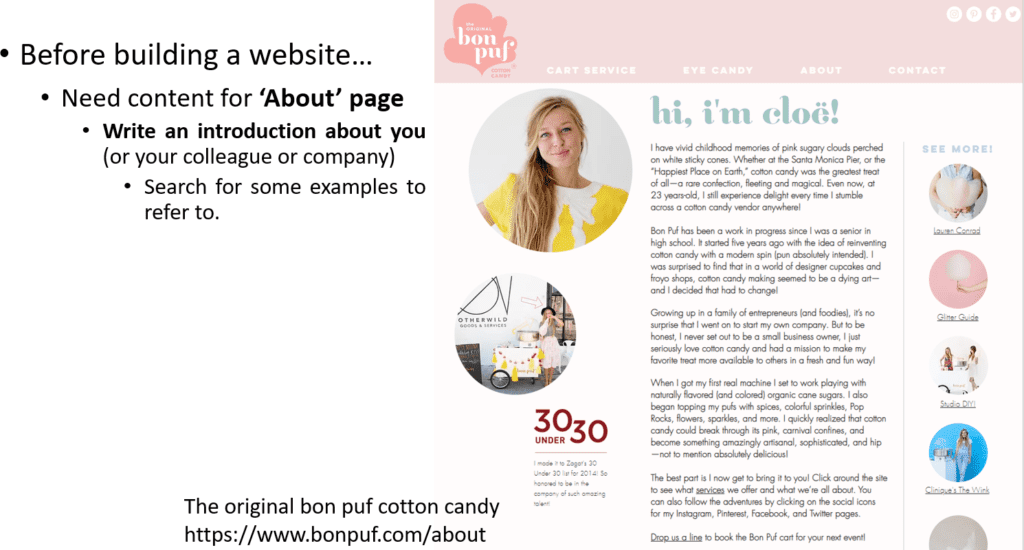
Think of content for ‘About’ page and write an introduction about you (or your colleague or company). You may search for some examples to refer to.
Then, think of the major content on the website. If you are a job seeker, the potential content may include professional knowledge such as digital marketing, social media, content creation, and so on. You can also upload stories about your personal achievement or experience such as awards, community service, internship, and so on. If you have some companies that you want to join, upload related news such as marketing activities from companies. But never forget consistency is the key!!

When you have your website, you definitely want to have a logo and an icon for your website. If you have no knowledge of graphic design, that is not a big issue at all. You can create them at Canva. You may refer to a video clip: ‘How to Use Canva to Design a Logo for FREE [2021]’.
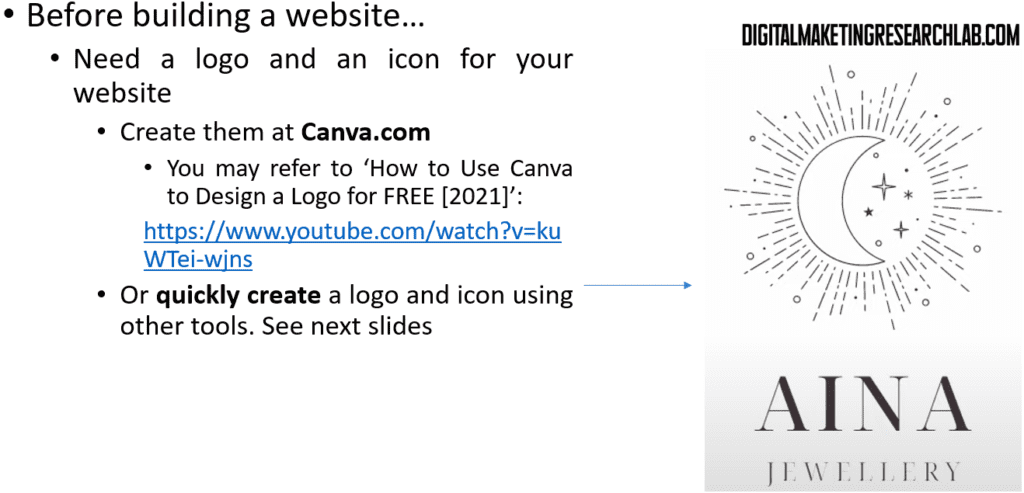
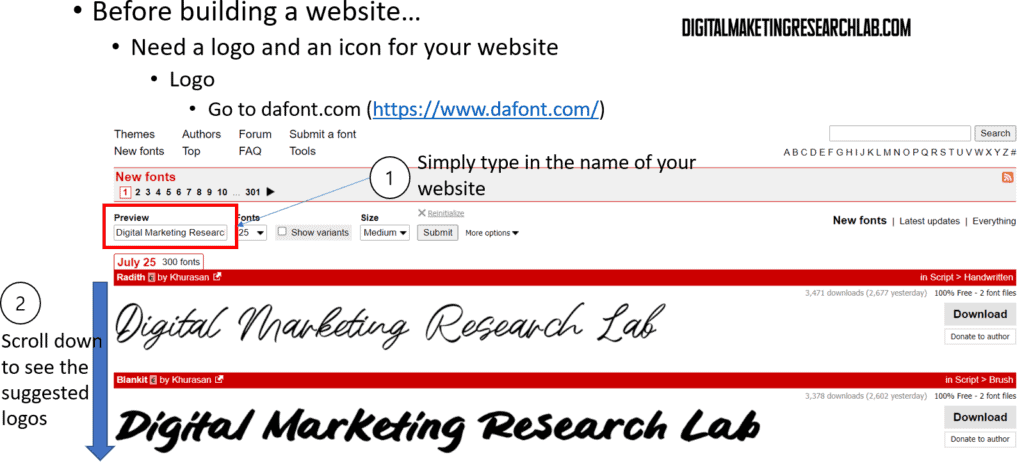
But, if you want to have a quick solution, you may refer to see the next slides. First, you can go to Dafont and follow the directions below to create a logo.

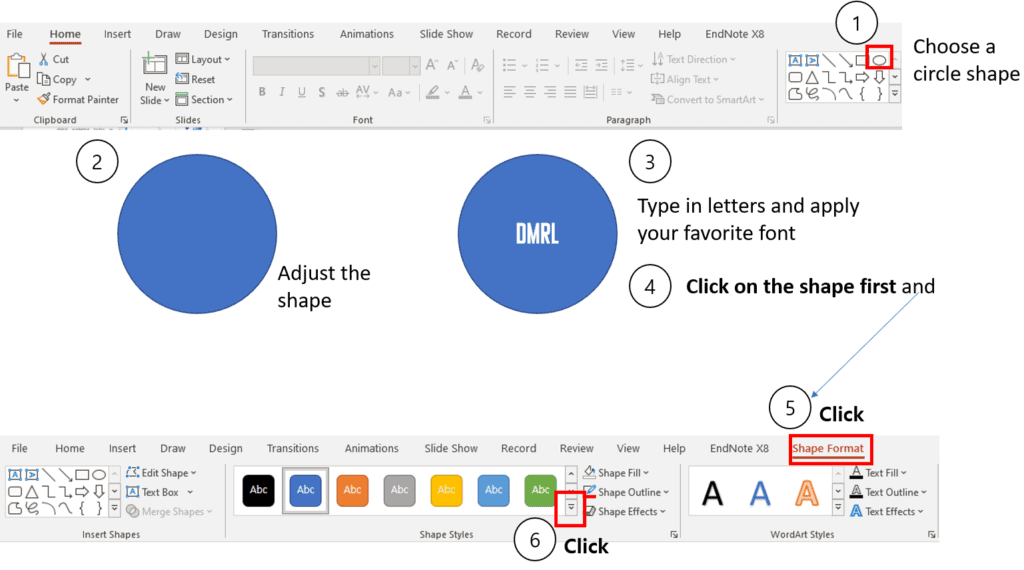
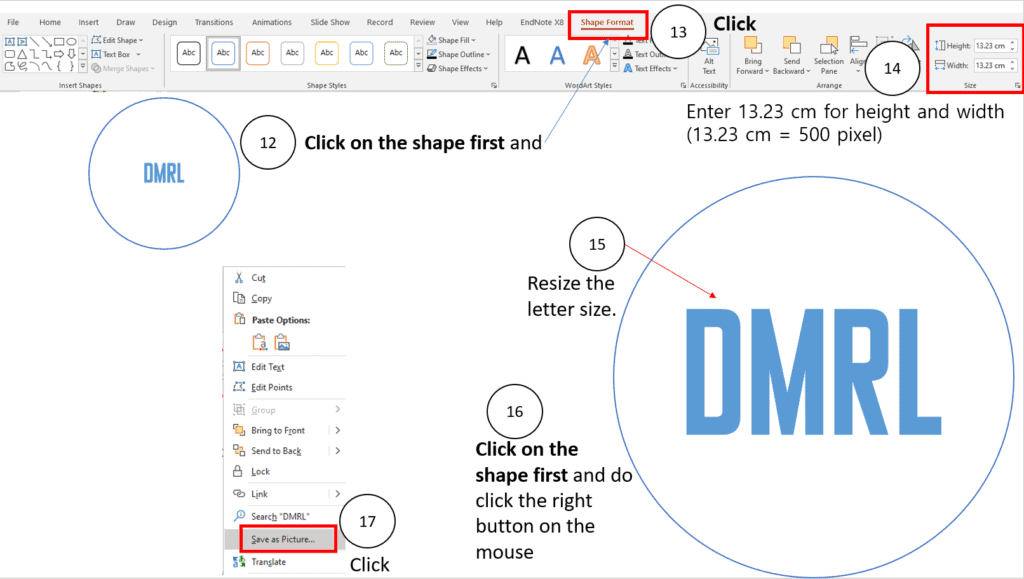
Now, let’s create a logo using PowerPoint. You can complete this job following the directions below.


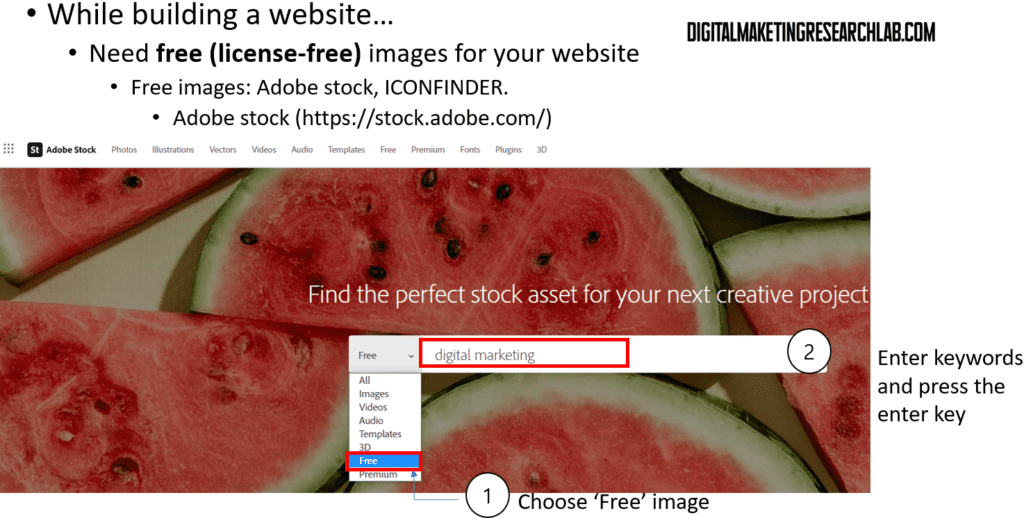
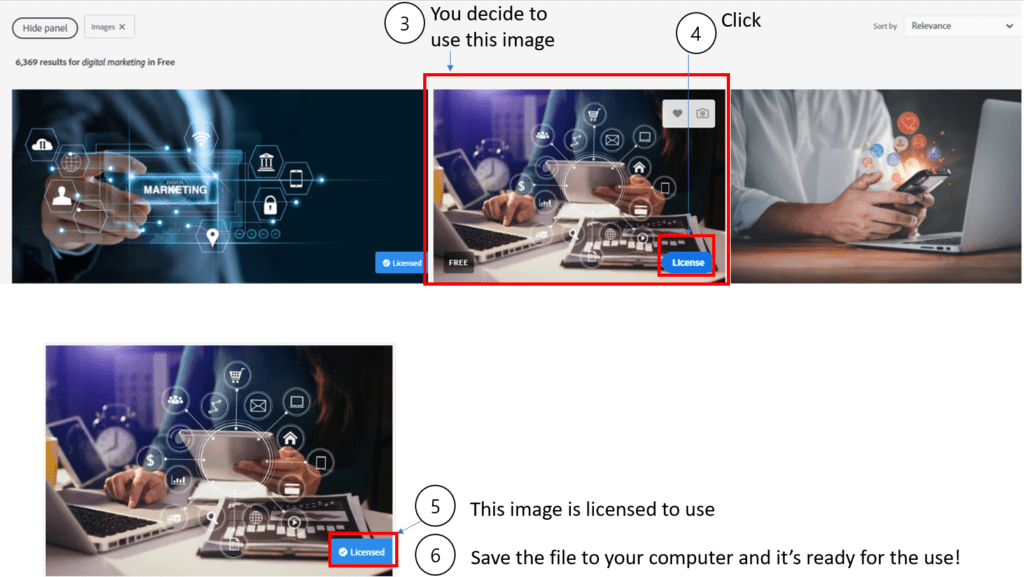
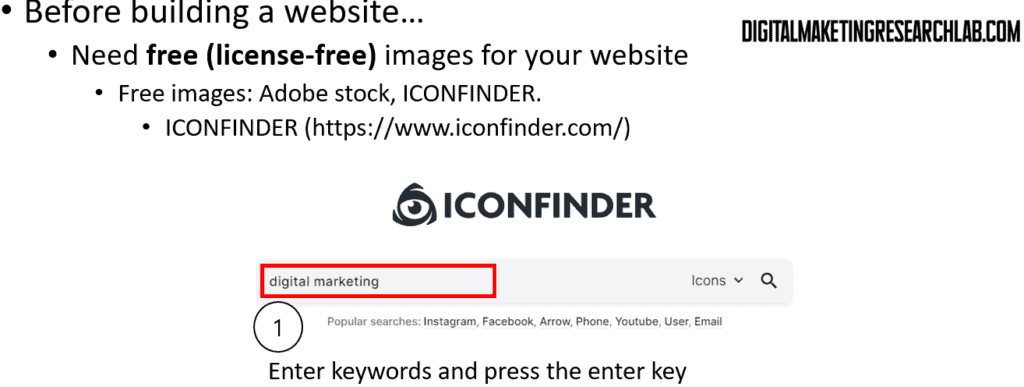
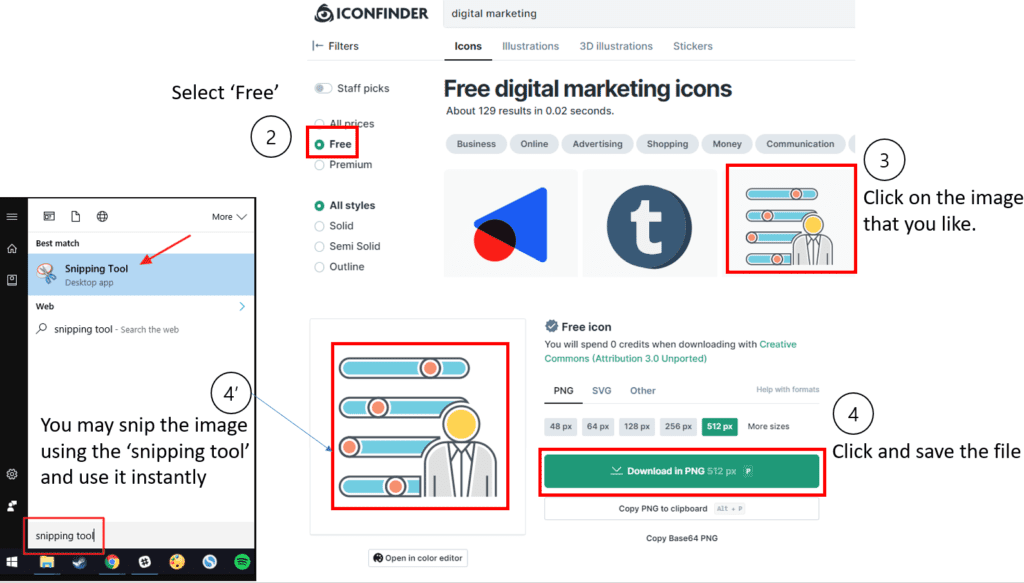
Now you have your logo and icon. But you may need relevant images and icons when you create your content. Those images will help you convey your idea to audiences efficiently. Although you may borrow images or icons from other websites by quoting the source, it would be better to use license-free images and icons.
For free images, you may try Adobe stocks, first.
For free icons, you may try ICONFINDER, first.
Now, you are ready to build your website. Let’s move on!
Let’s build a website!
Before you start
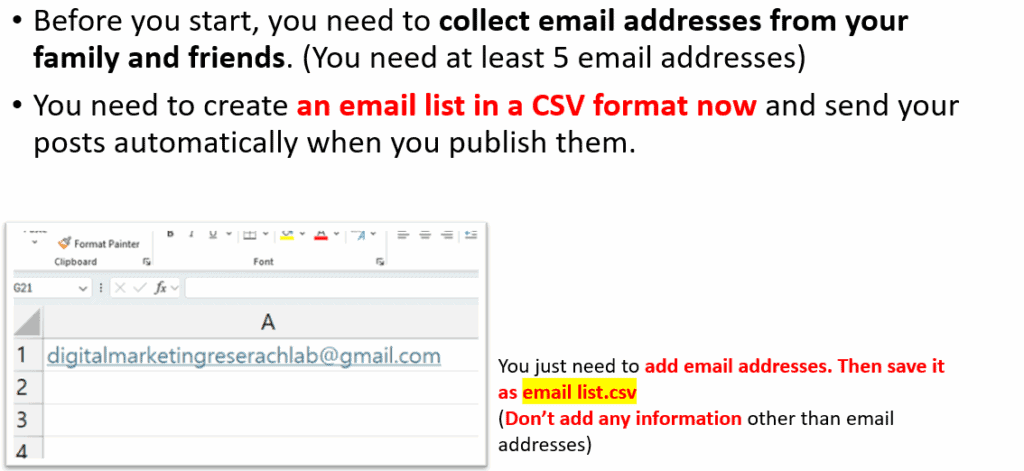
Set up an email list
Now we are almost ready to build our website. Before we begin, let’s set up an email list for the emailing system that will notify your readers whenever you upload a new post. Let’s create this email list using your email, your friends’ emails, and your family members’ emails, as shown below.
Trouble shooter
When students build websites or complete related tasks by following various guides, they often encounter confusion because the interfaces of various apps and plugins can change frequently without notice. As a result, the screens shown in the guide do not match the interfaces the students actually see. In such cases, students must take a screenshot of their current screen, upload it to ChatGPT, and ask where the corresponding menu or feature can be found in the interface they are viewing.
However, a major issue is that ChatGPT frequently responds using older versions of the interface, which only increases confusion.
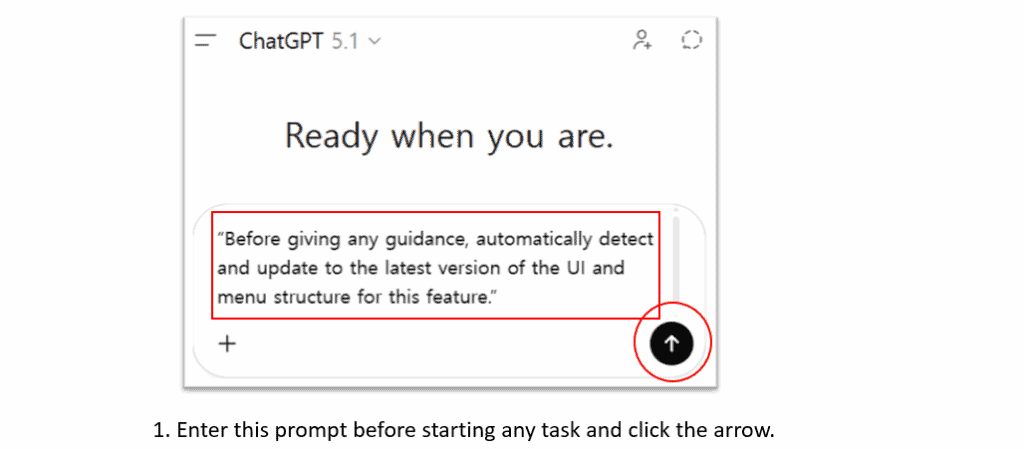
Therefore, students need to instruct ChatGPT to update itself to the latest version of the interface before providing a guide. The optimal prompt for doing this is:
“Before giving any guidance, automatically detect and update to the latest version of the UI and menu structure for this feature.”
In practice, students should enter this prompt before starting any task. Then, if the guide ChatGPT provides does not match the interface they see, they can simply upload a screenshot of their current screen, and ChatGPT will provide updated instructions aligned with the latest interface.
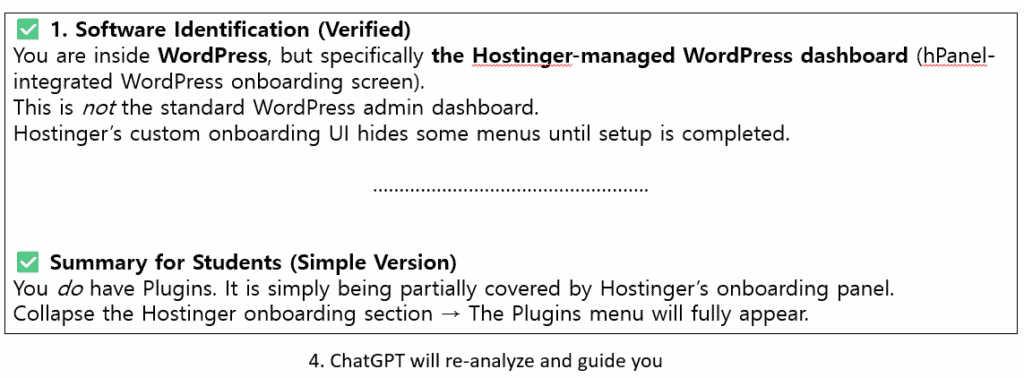
Let’s break it down what you should do when the interface doesn’t match the guide.
1) Enter this prompt into the prompt field on ChatGPT before starting any task: “Before giving any guidance, automatically detect and update to the latest version of the UI and menu structure for this feature.”
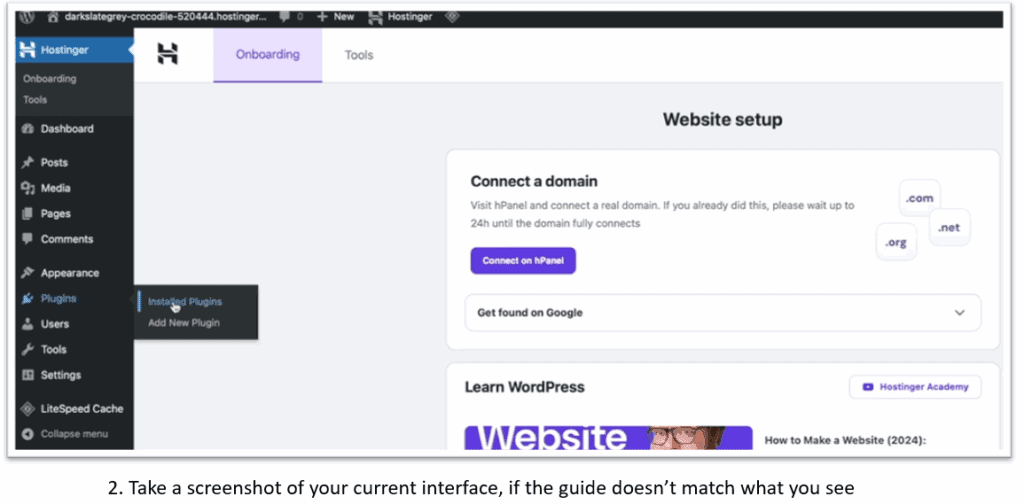
•2) If the guide doesn’t match what you see, take a screenshot of your current interface.
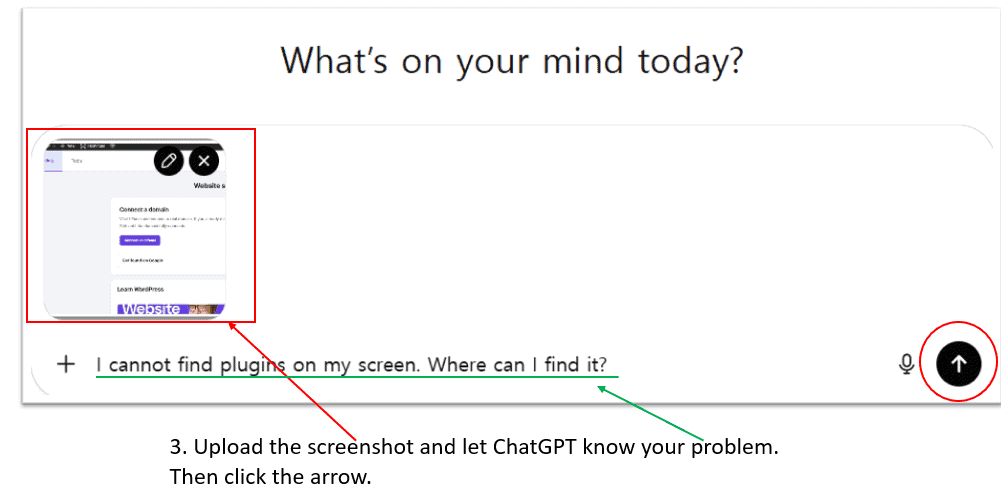
3) Upload the screenshot to ChatGPT: Ask ChatGPT to identify the software and explain where to find the correct menu or feature in the latest UI.
4) ChatGPT will re-analyze and guide you: It will update to the newest interface and show you where to find the correct menu or settings.
Hosting service
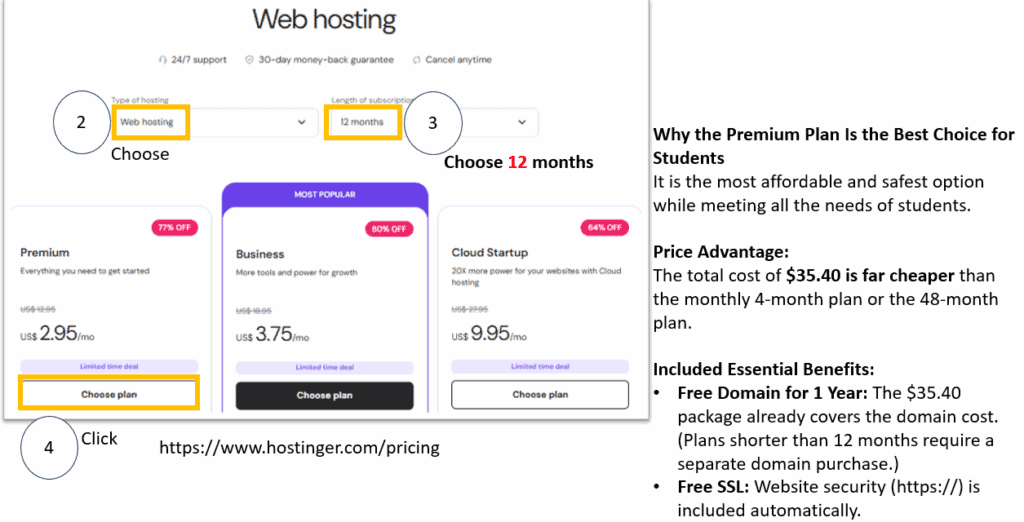
To operate a website, it is recommended to sign up for a web hosting service. Using web hosting is far more efficient than running your own server in terms of stability, security, speed, and maintenance cost.
In addition, it offers the best price-to-performance ratio, and it includes all the essential features that students and beginners need—such as SSL, a domain, backups, and data center options.
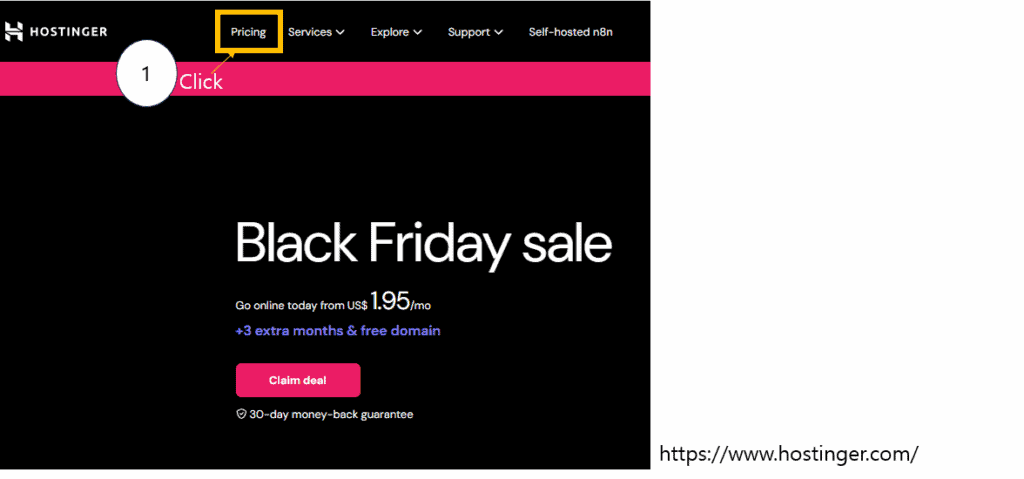
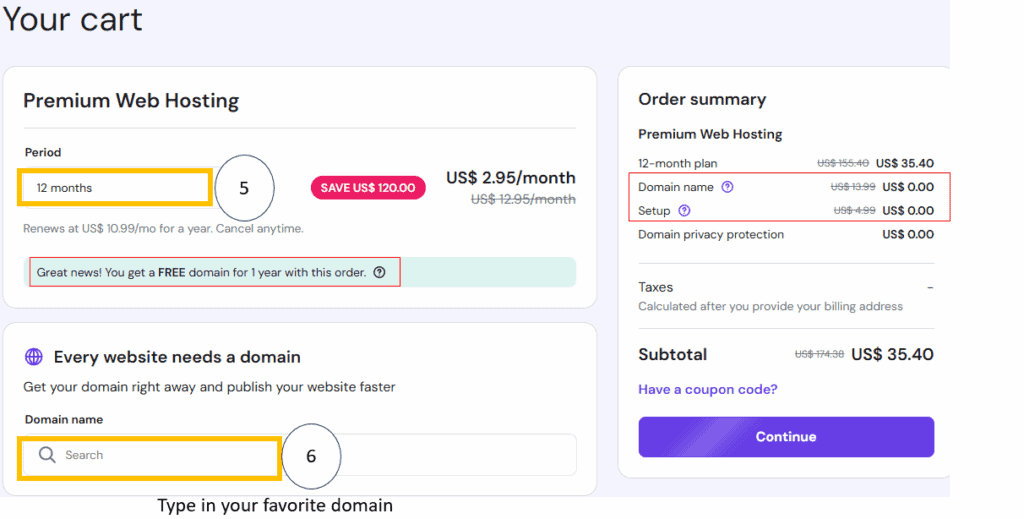
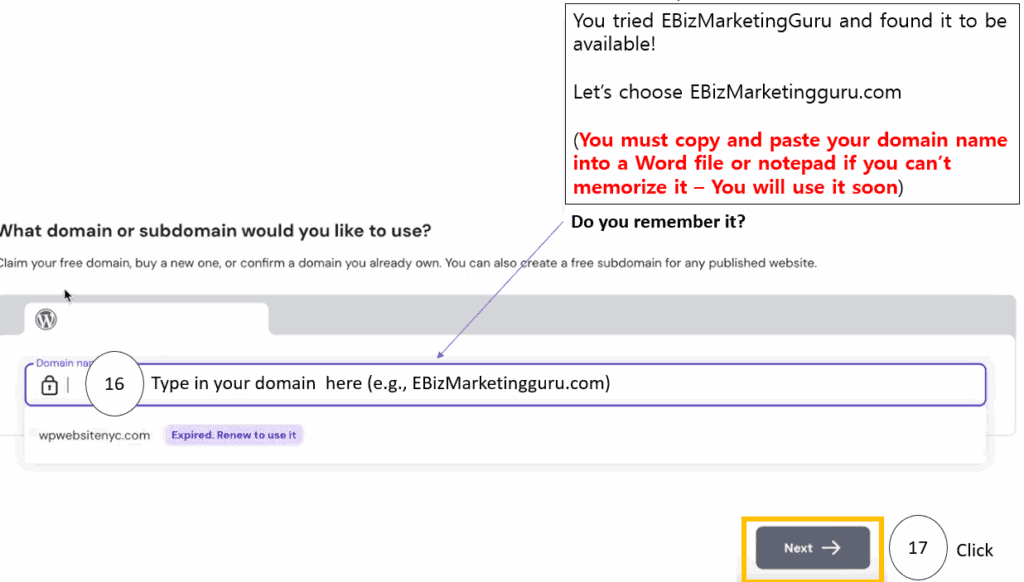
Now, let’s choose the name of your website (your domain name) and check whether it is actually available. If it is not available, you must keep searching until you find one that is. When choosing a domain name, you must be very careful with the spelling.
Once a domain is registered, its spelling cannot be changed. If there is a typo, you may need to cancel the purchase, request a refund, and go through the process of buying a new domain again.

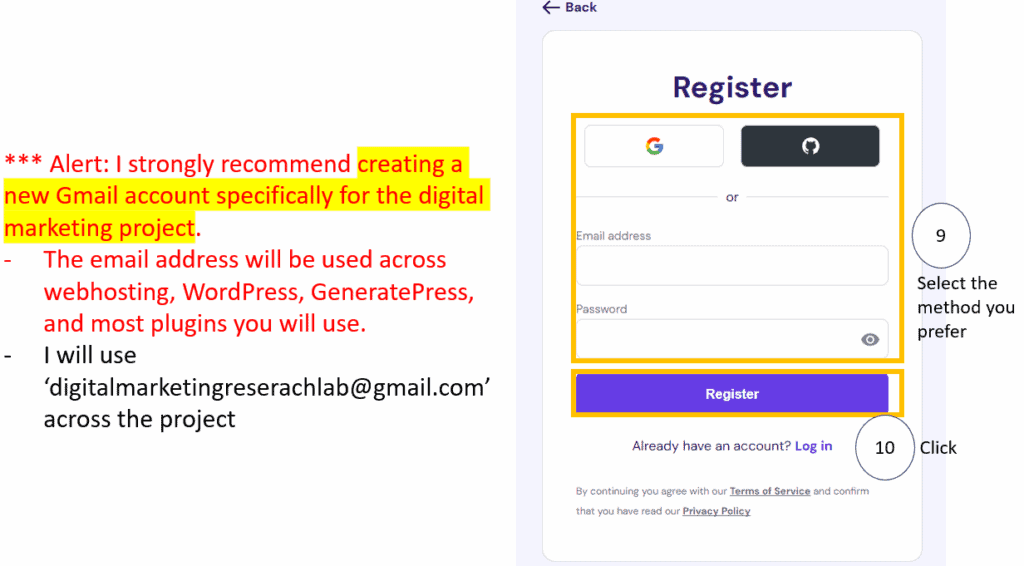
Before we move on, I strongly recommend creating a new Gmail account specifically for the digital marketing project. The email address will be used across webhosting, WordPress, GeneratePress, and most plugins you will use
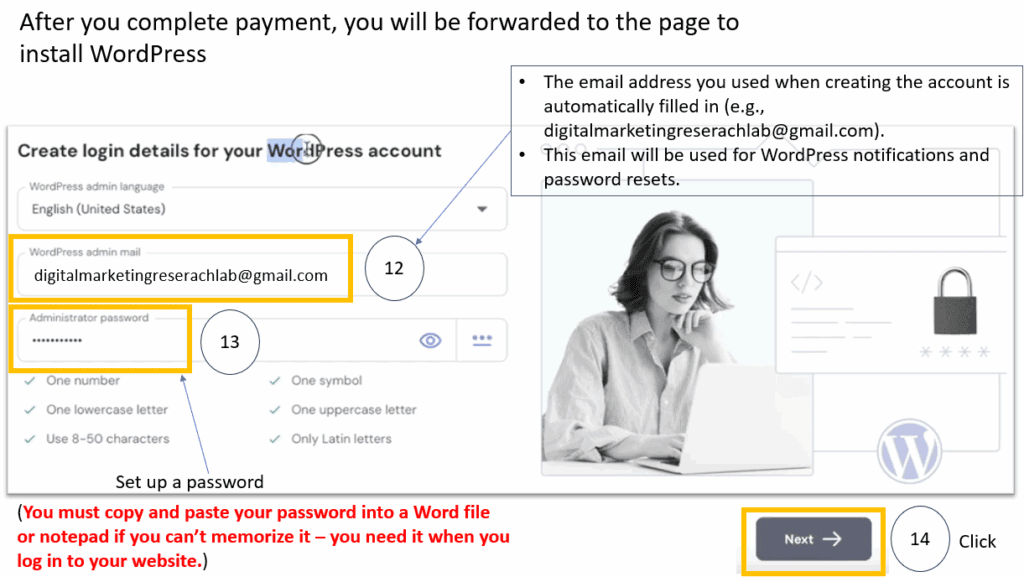
After you complete payment, you will be forwarded to the page to install WordPress. •The email address you used when creating the account is automatically filled in. This email will be used for WordPress notifications and password resets. Never forget to memorize your password.
Here, you will type in your domain name. You still remember your domain name?
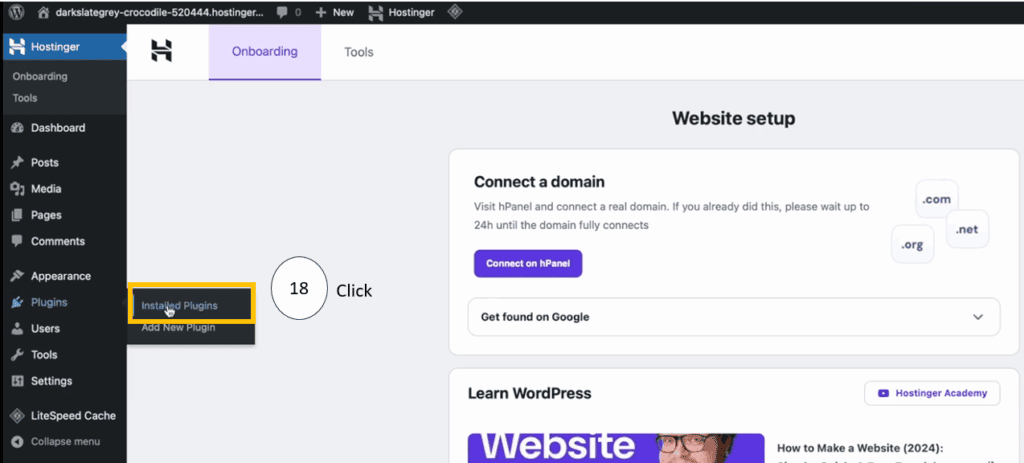
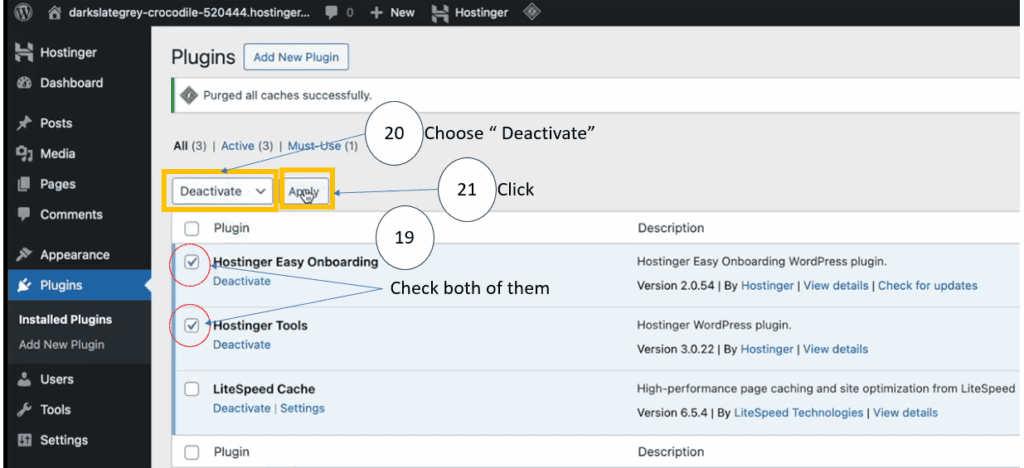
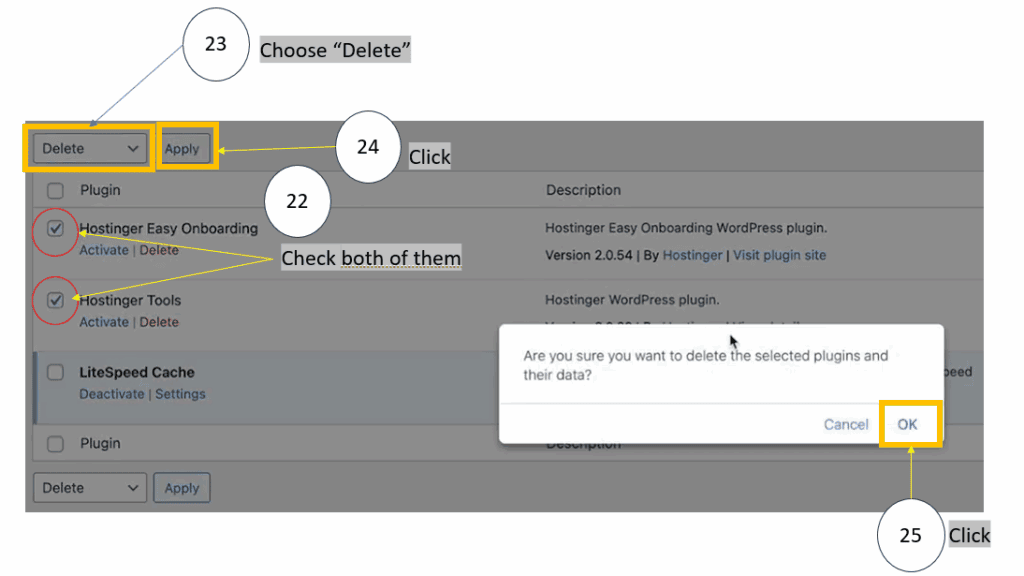
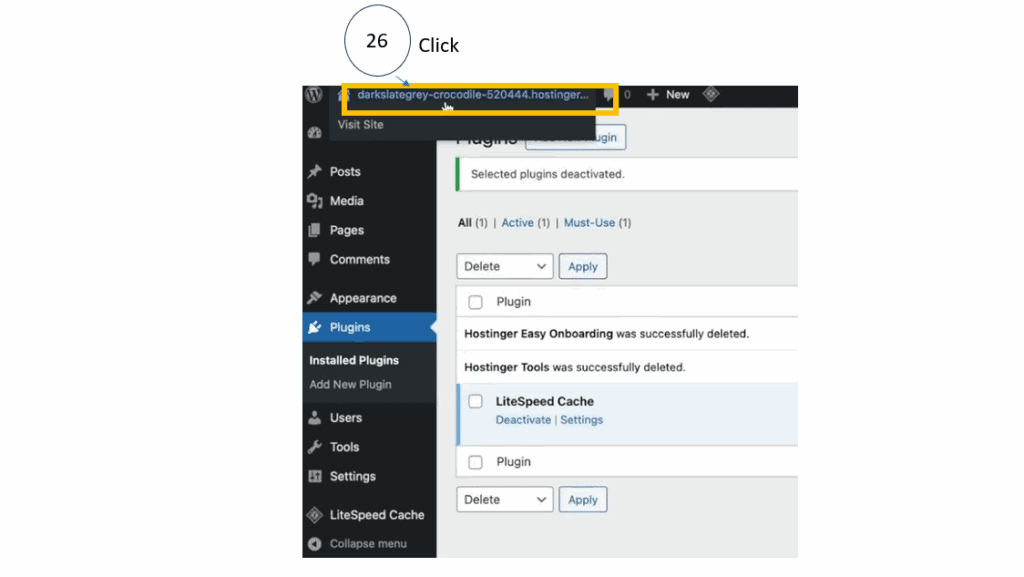
Clean up WordPress: Delete plugins.
Now we will delete unnecessary plugins in WordPress and add the ones we need.
Plugins are apps that infinitely expand the functionality of WordPress and allow you to build a professional-level website without writing any code.
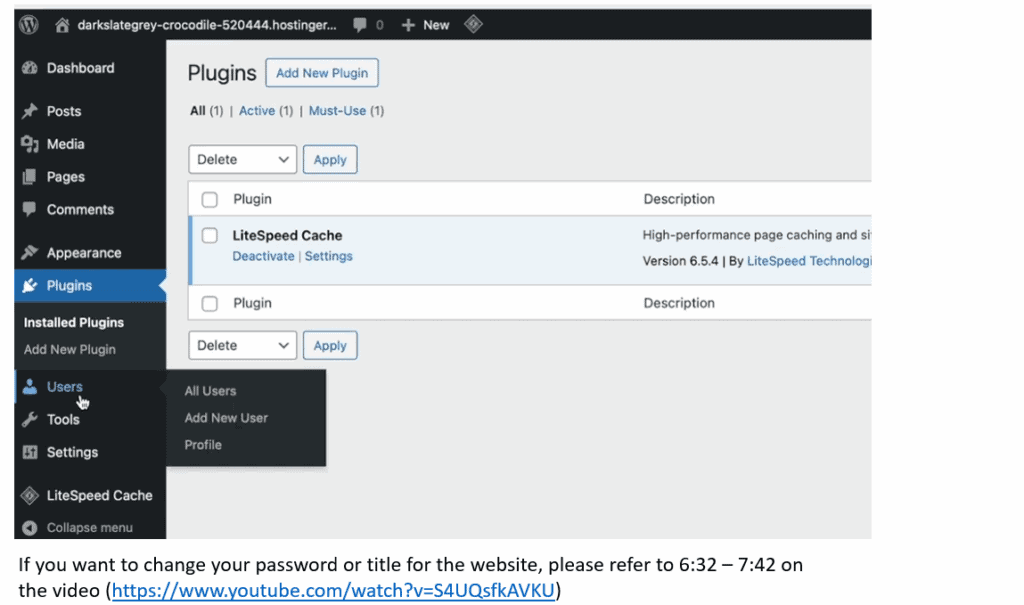
If you want to change your password or title for the website, please refer to 6:32 – 7:42 on the video (https://www.youtube.com/watch?v=S4UQsfkAVKU)
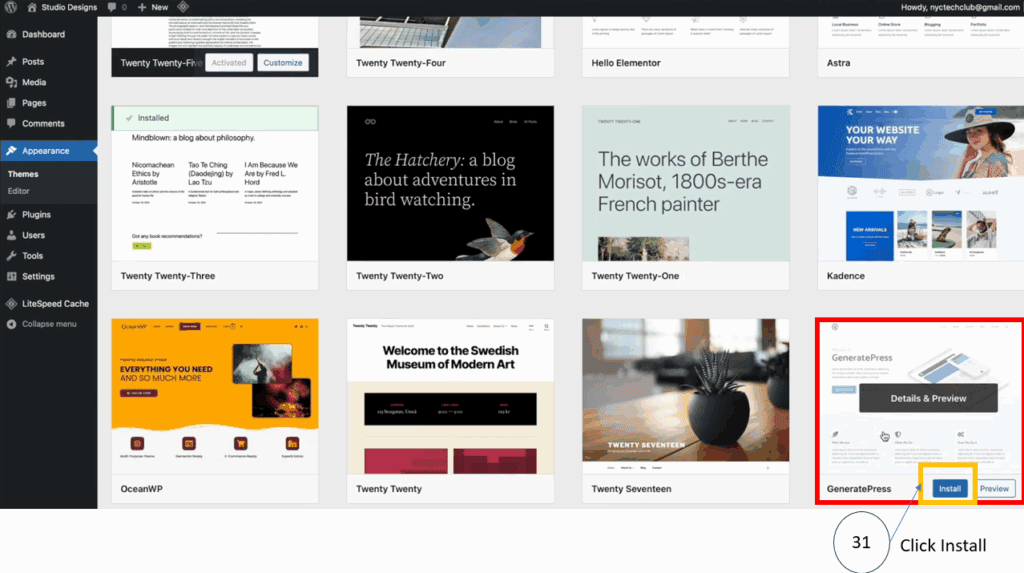
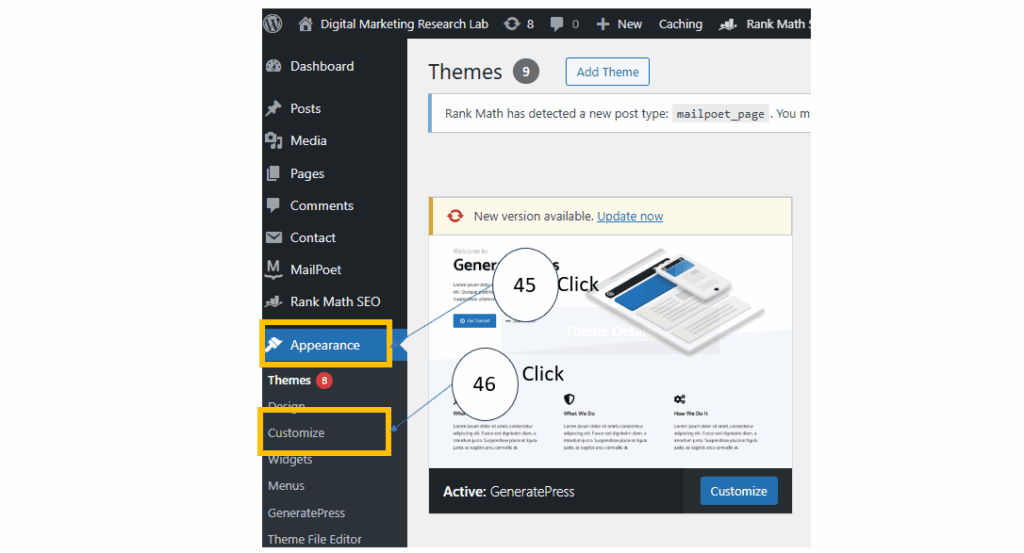
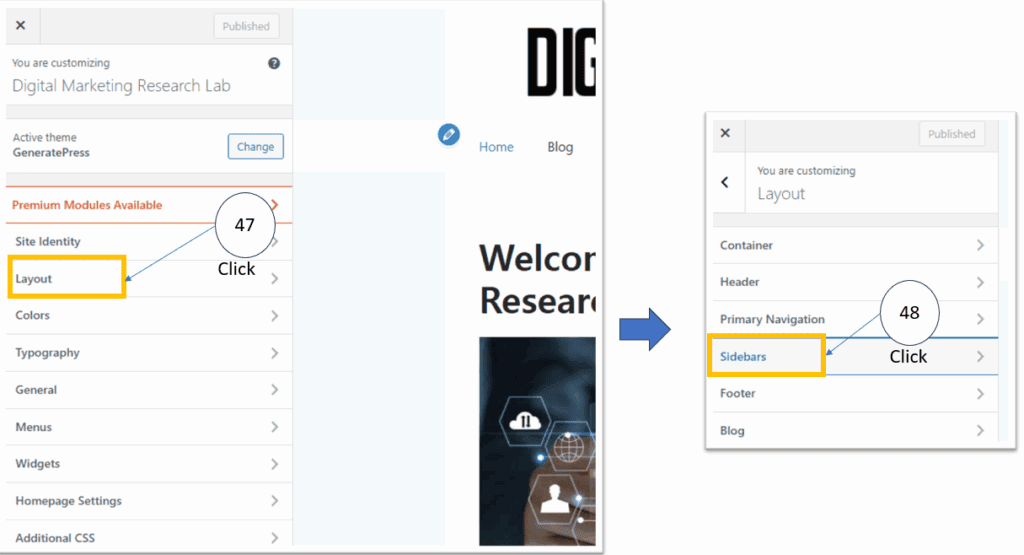
Setting Theme: GeneratePress
Now let’s set the theme in WordPress. We will install GeneratePress. GeneratePress is lightweight, fast, highly stable, and the best WordPress theme for creating a professional website without writing any code.

Choose GeneratePress and install it. Then, you will add plugins.
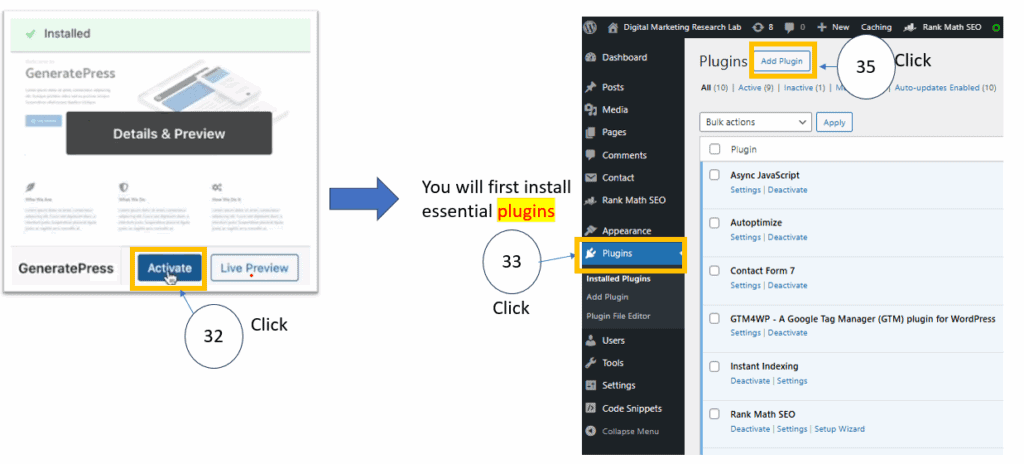
Plugin install
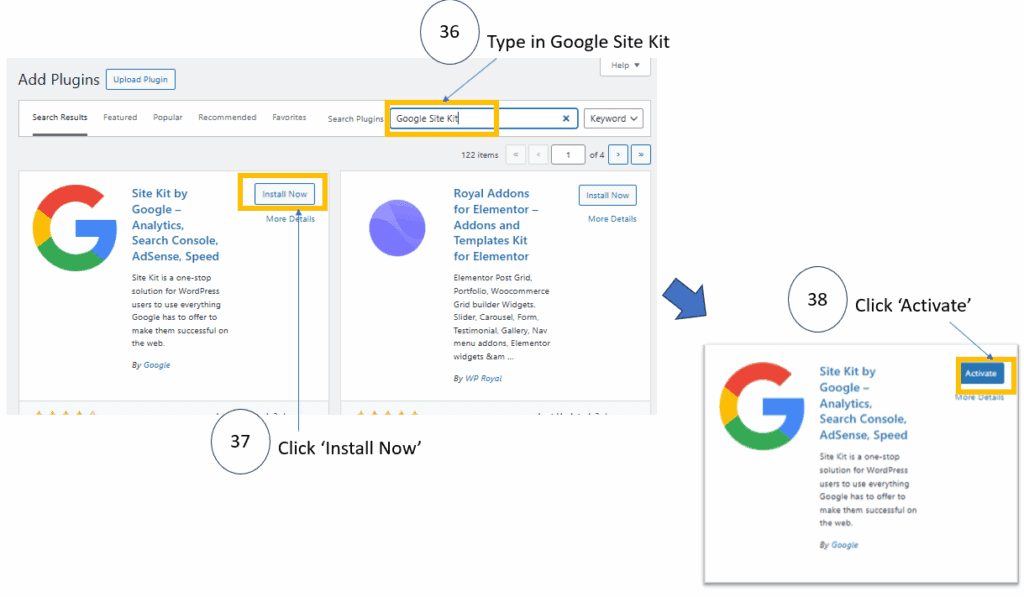
You will install Site Kit first. Site Kit is an official Google plugin for WordPress that connects Google Analytics, Search Console, PageSpeed, and other tools in one place, helping you maximize your site analysis and management efficiency.
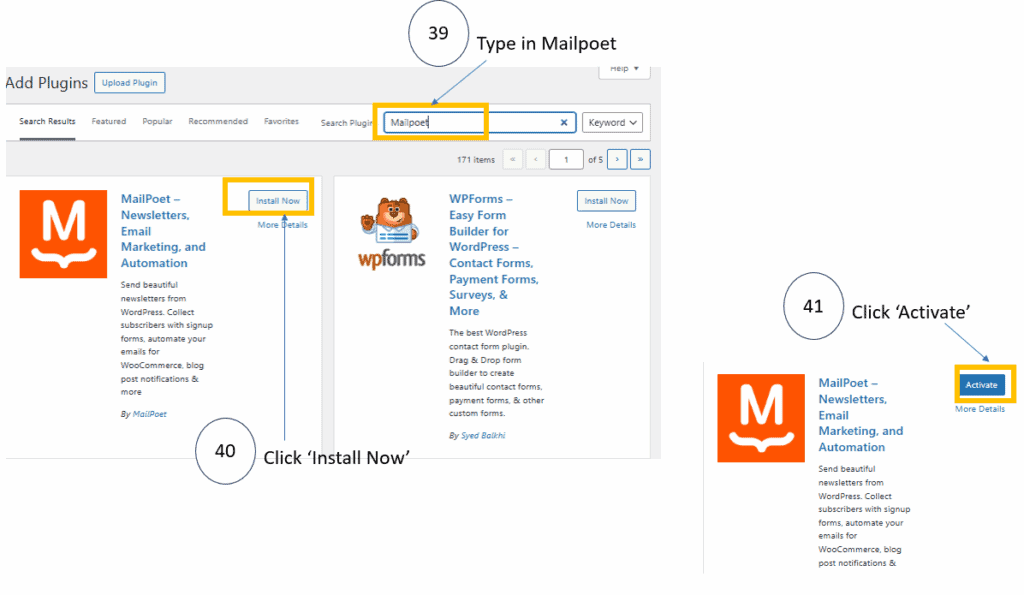
Now you will install MailPoet. MailPoet is a plugin that handles newsletters, subscriber list management, and automated email delivery directly inside WordPress, making it essential for running an educational or content-focused website.
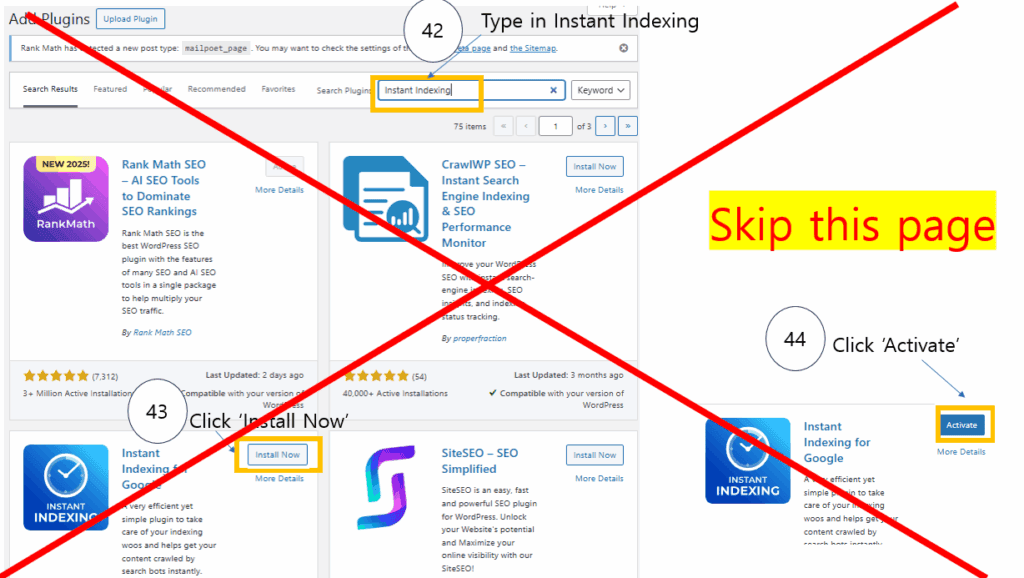
Instant Indexing can be helpful in some cases, but it is complicated for beginners and provides no benefit for Google indexing. Therefore, there is no need to install it, and we will skip this step.
Setting Up Your Website’s Appearance
Now, let’s begin setting up the appearance of your website.
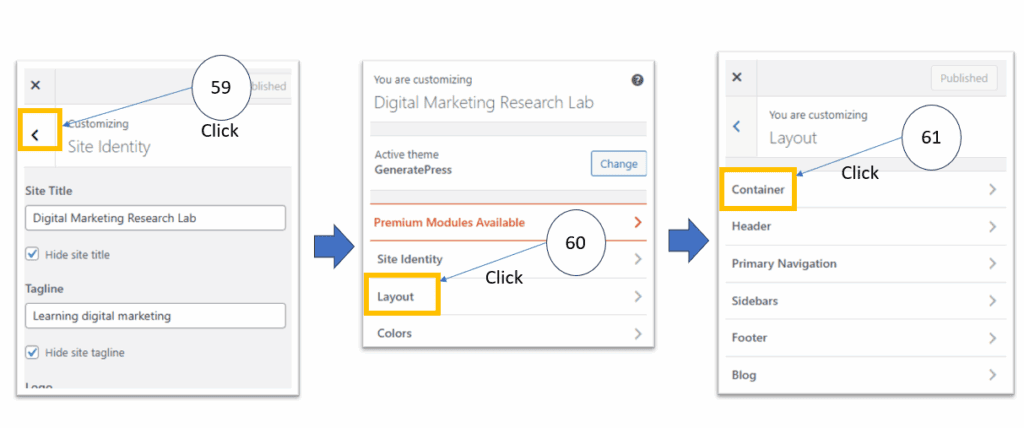
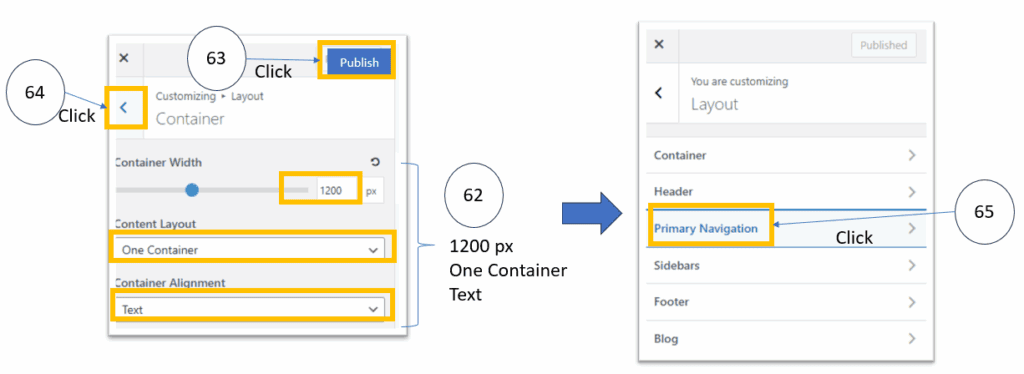
You will set up the initial configuration to standardize your website’s basic layout, branding, and structure. Through the steps below, you will establish the core framework of your website (brand identity, structure, navigation, and layout), resulting in an official, fully identifiable site across search results, browsers, and mobile devices.
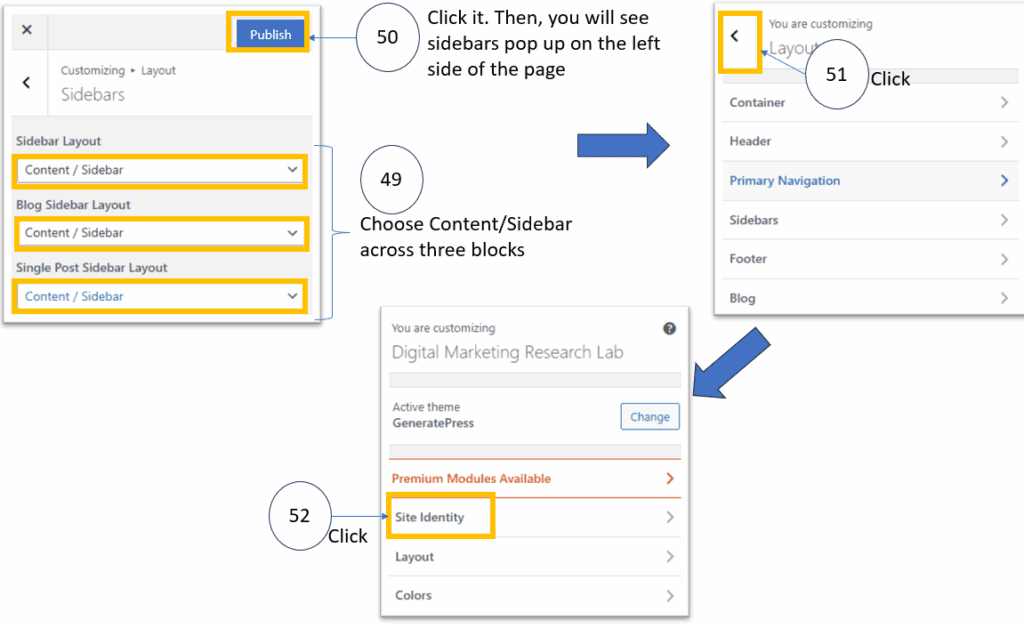
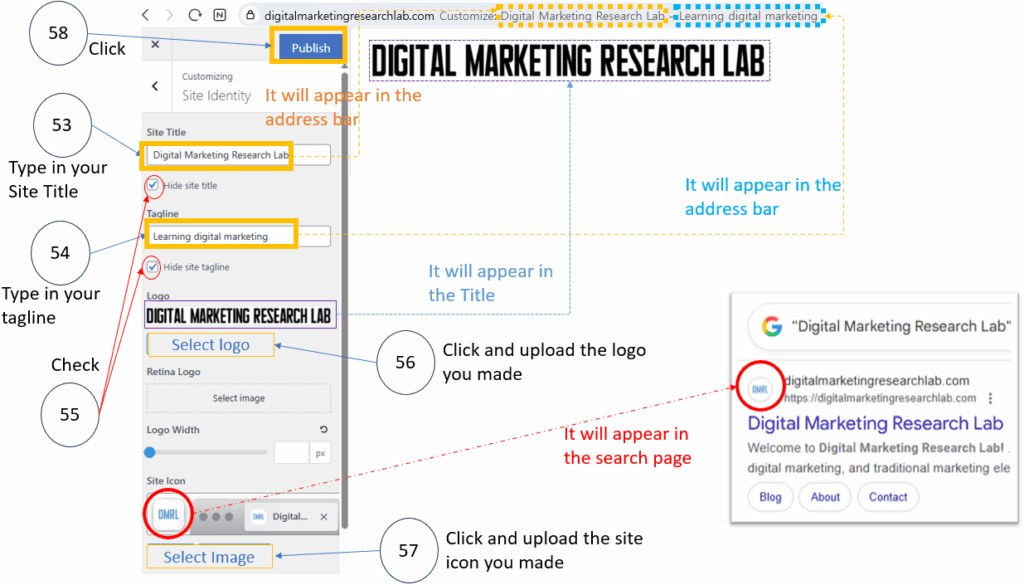
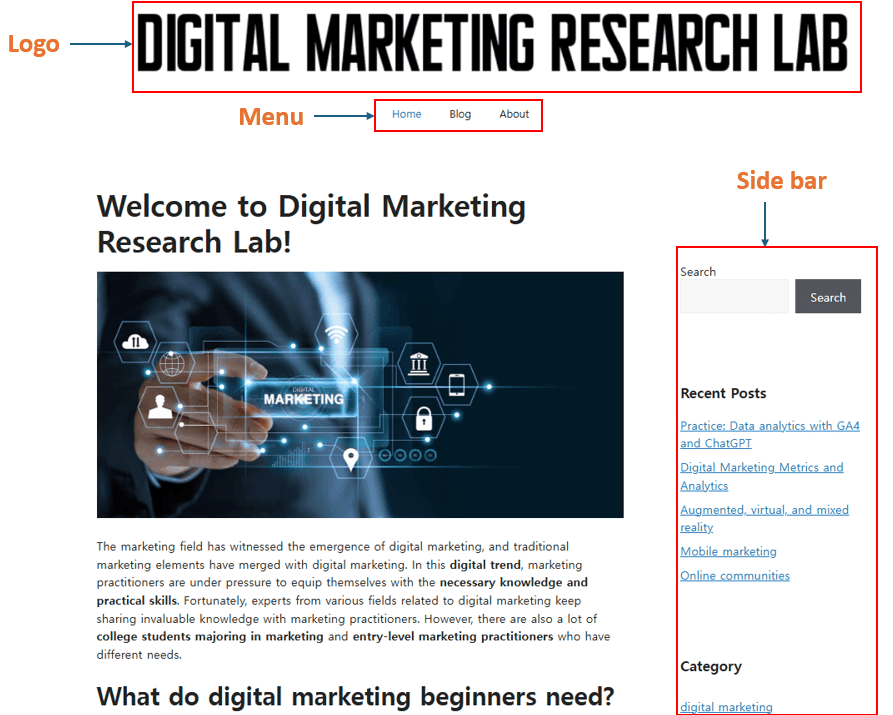
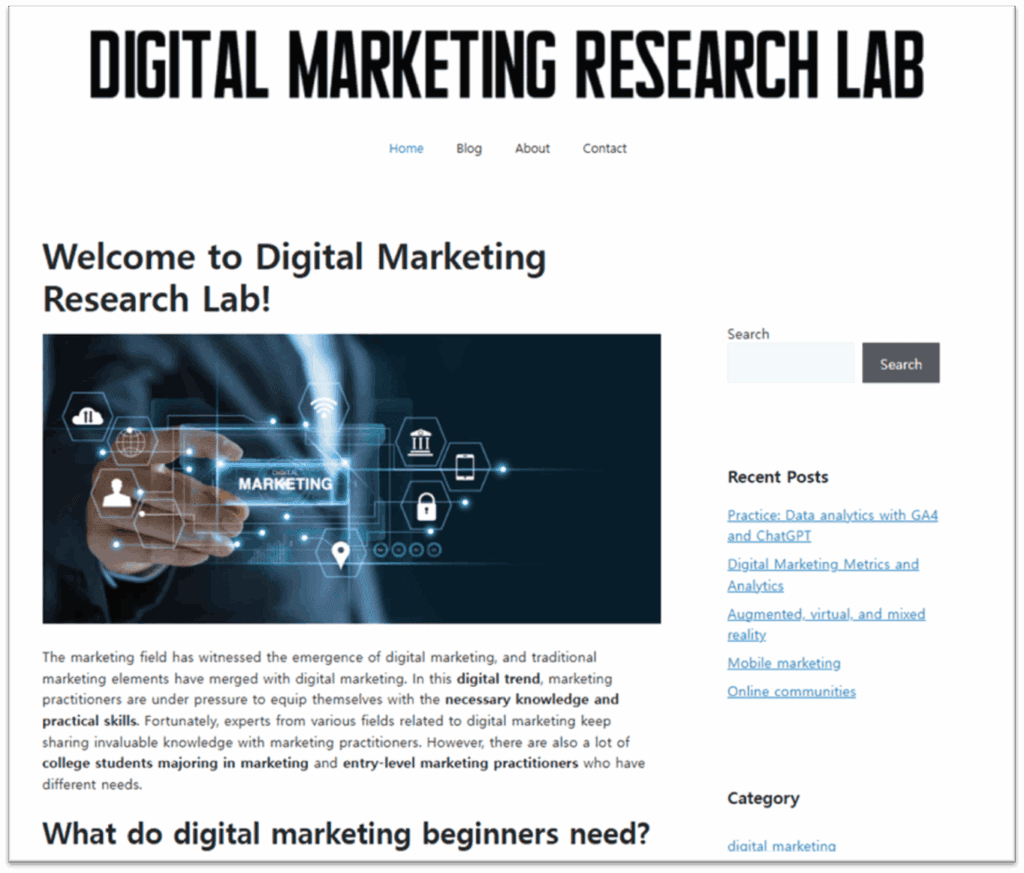
Now, you can see a logo, a main menu, and a sidebar are created
Now let’s standardize the behavior of your site navigation (menu) and global UI settings. In other words, this is the UX configuration process that determines how the site looks, how the menu opens, and how links are displayed. This setup will produce the following results:
(A) Standardized menu appearance: a wider, centrally aligned, professional navigation bar
(B) Improved dropdown UX: menus open smoothly on hover
(C) Enhanced readability: all links display consistent underline styling
(D) Higher-quality UI performance: crisp high-resolution icons and faster loading speed
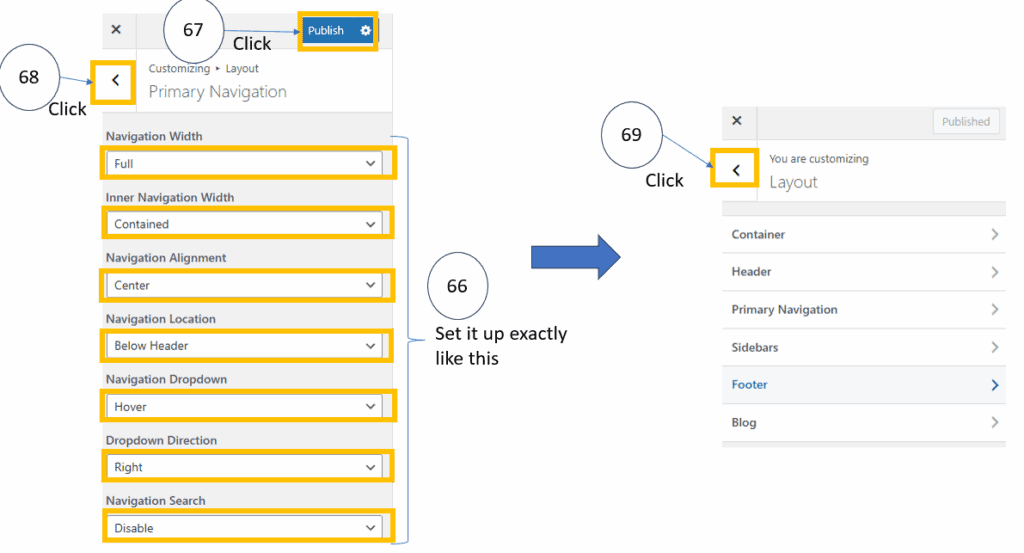

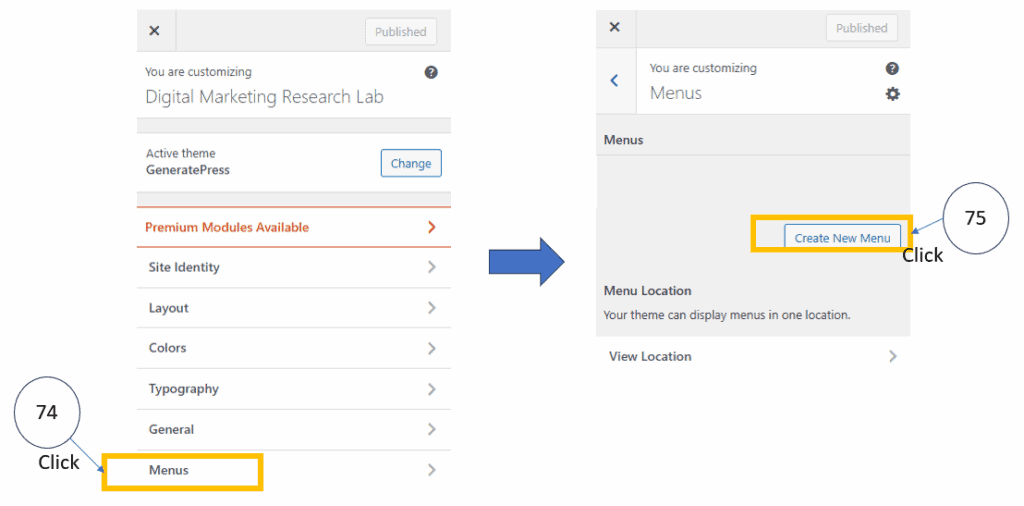
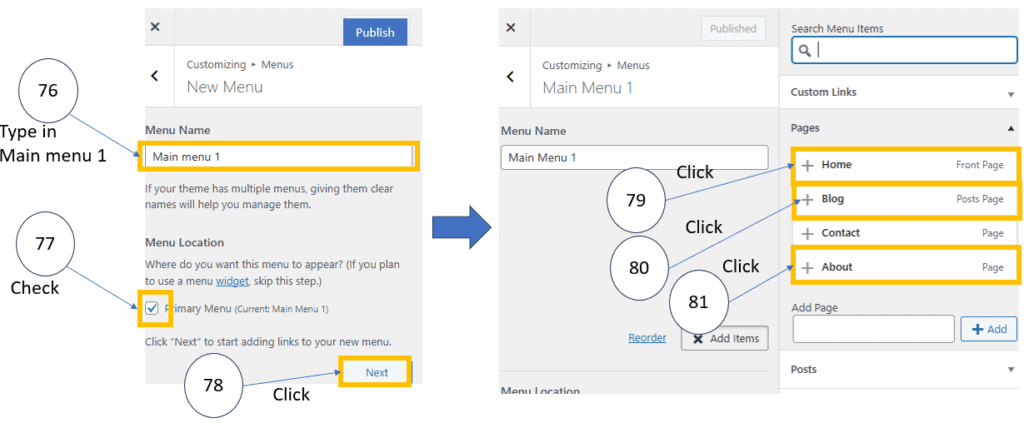
The next step is the process of creating the site’s official main menu and fixing its structure, order, and items exactly the way you want. As a result of this setup, the automatic default menu disappears, a professional “official main menu” is applied, and the site’s navigation is fully completed.

Now, you have created and own a website! Conglaturations.
Congratulations! You finally have your own website! Now, when you log in to your website for editing, you can follow the procedure.
Writing on a page
Create the homepage content
Before we start writing, let’s first check what options are available in the menu.
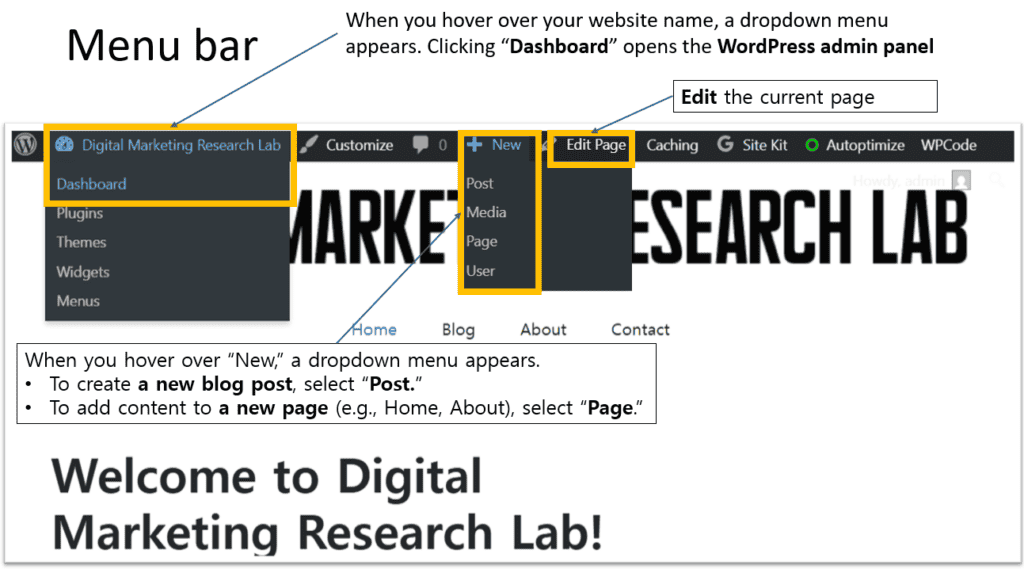
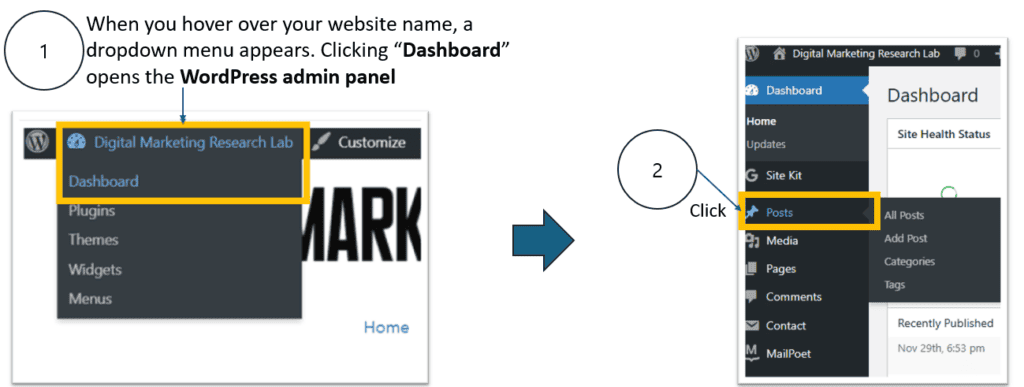
The menu bar at the top of your WordPress site provides quick access to key editing functions.
When you hover over your website name on the left side of the bar, a dropdown menu appears.
Clicking “Dashboard” opens the WordPress admin panel.
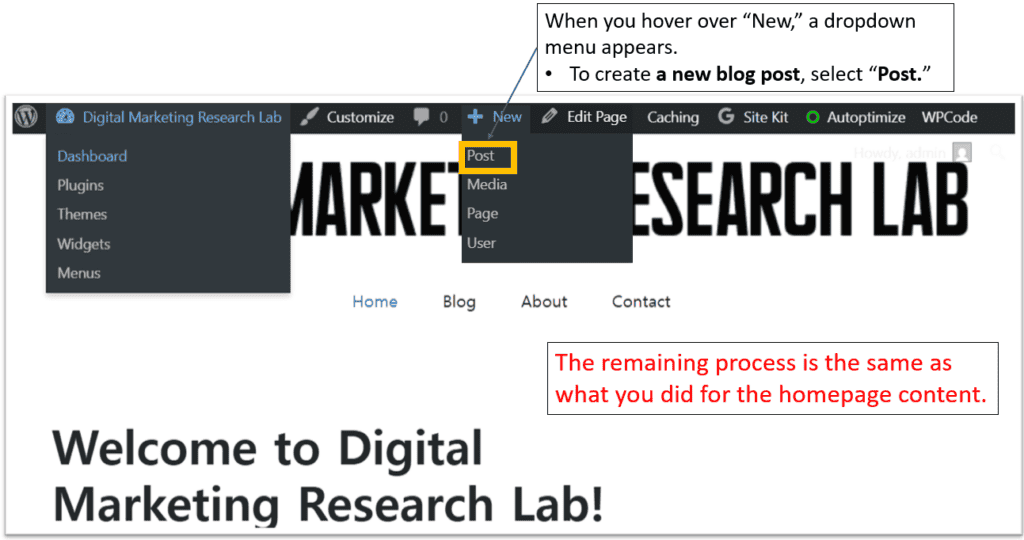
- If you hover over “New,” another dropdown menu appears.
- To create a new blog post, select “Post.”
- To add content to a new page—such as Home or About—select “Page.”
You can also edit the page you are currently viewing by clicking “Edit Page” in the top menu.
Now, let’s create the homepage content by following the steps below.

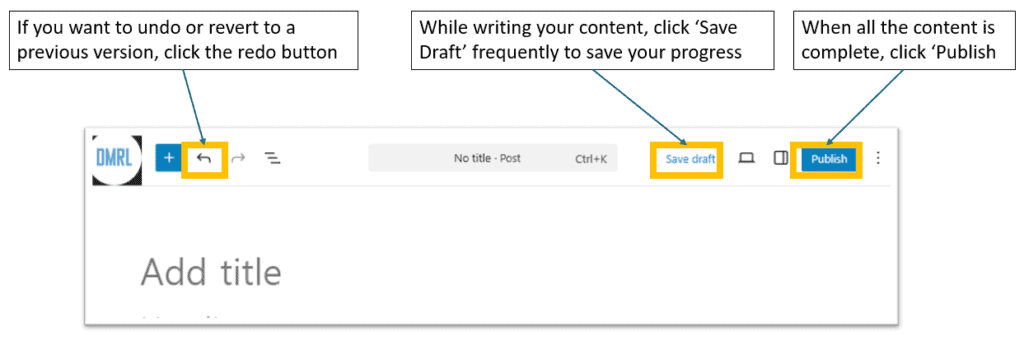
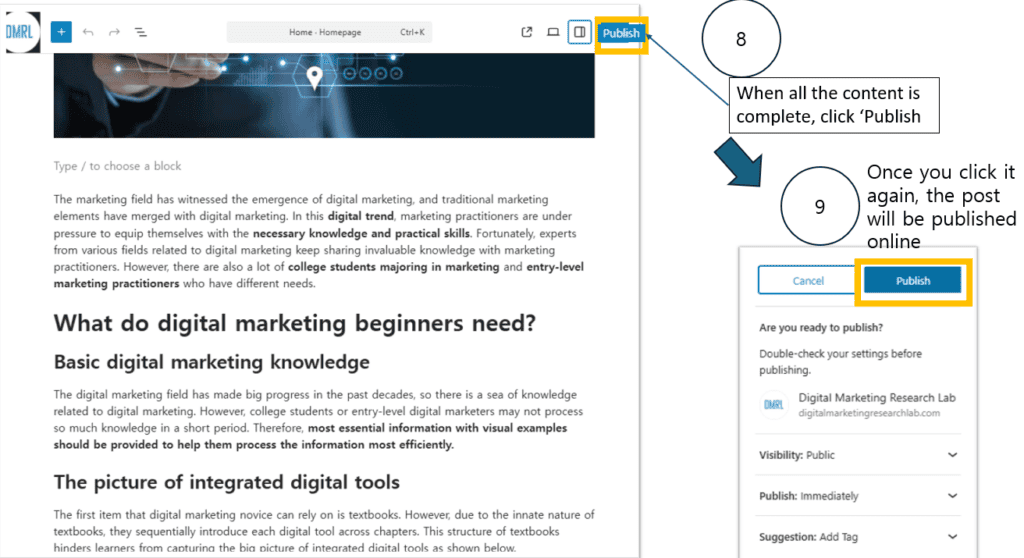
When you click ‘Edit Page,’ you will see the following options. If you want to undo an action or return to a previous version, click the redo button on the left. While writing your content, click ‘Save Draft’ frequently to save your progress. When all the content is complete, click ‘Publish’ to make your page go live.
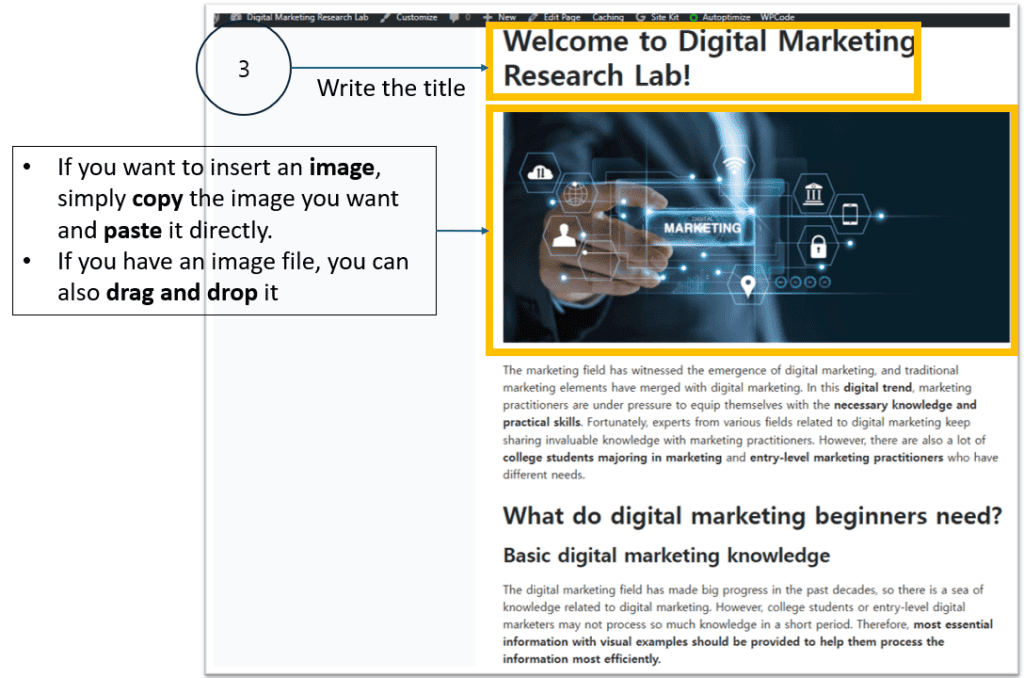
When editing your page, begin by writing the title at the top.
If you want to insert an image, you can simply copy the image you want and paste it directly into the editor. If you have an image file on your computer, you can also add it by dragging and dropping the file into the page. Once the image is inserted, you can continue writing your text content below it.
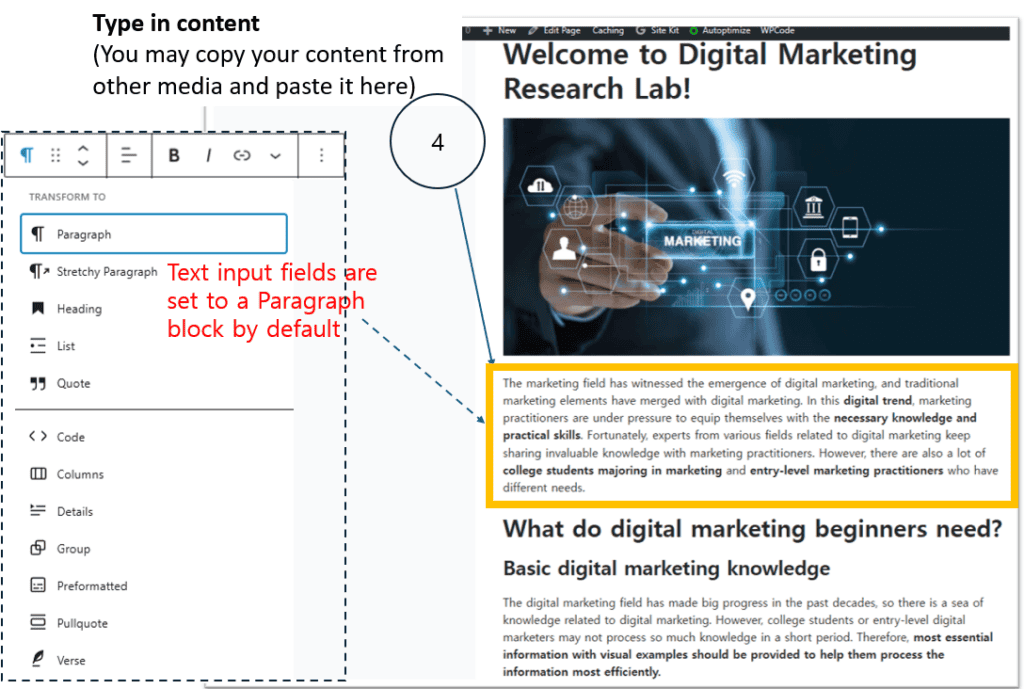
When typing in your content, you can copy text from other sources and paste it directly into the editor.
By default, the text input area is set to a Paragraph block, which is suitable for writing normal body text.
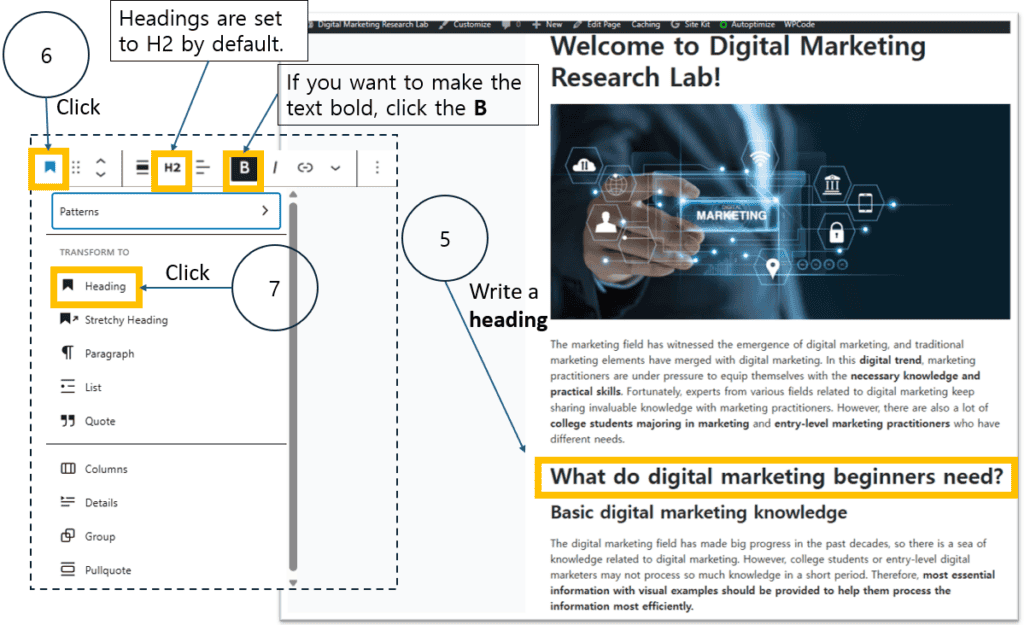
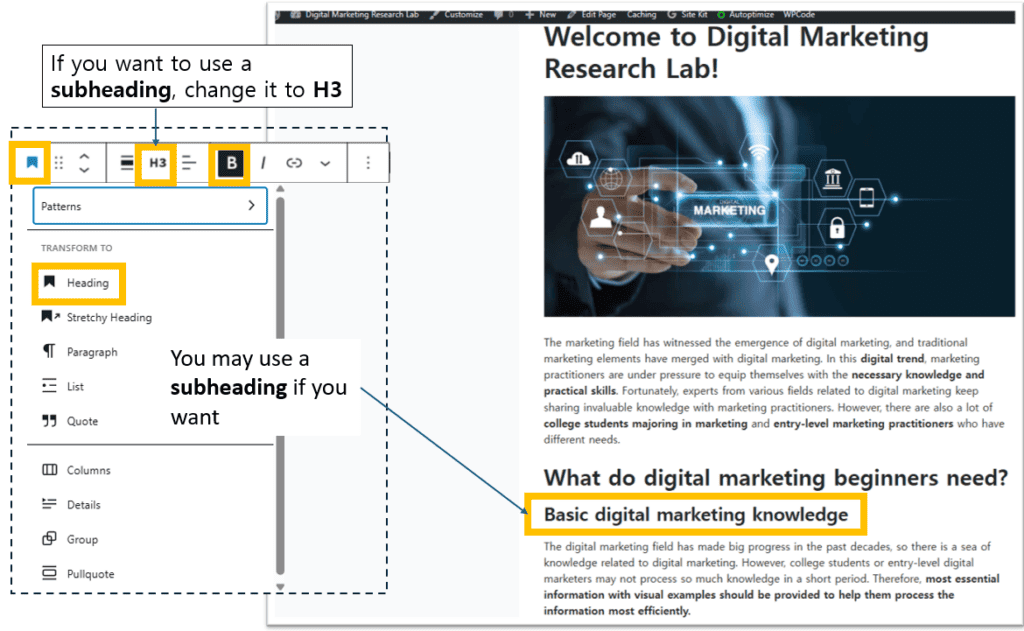
To add a heading to your content, first select the text block and click the Heading option.
Headings are automatically set to H2 by default. After choosing the heading block, write your heading in the text area. If you want to make the heading bold, click the B button in the toolbar.
If you want to add a subheading, you can change the heading level to H3. To do this, select the Heading block and then click H3 in the toolbar. Once you choose the H3 option, type your subheading in the editor, and it will appear below the main heading.
When you finish writing all of your content, click the ‘Publish’ button at the top right of the editor. After clicking it once, a confirmation panel will appear on the right side. Click ‘Publish’ again to finalize the process. Once you do this, your post will be published online and become visible to the public.
Create a post content
To create a new blog post, hover over the “New” menu at the top of the screen. When the dropdown menu appears, select “Post.” This will open the editor where you can write your post. The remaining steps—writing content, inserting images, adding headings, and publishing—are the same as the process you followed for creating the homepage content.
How to link a page
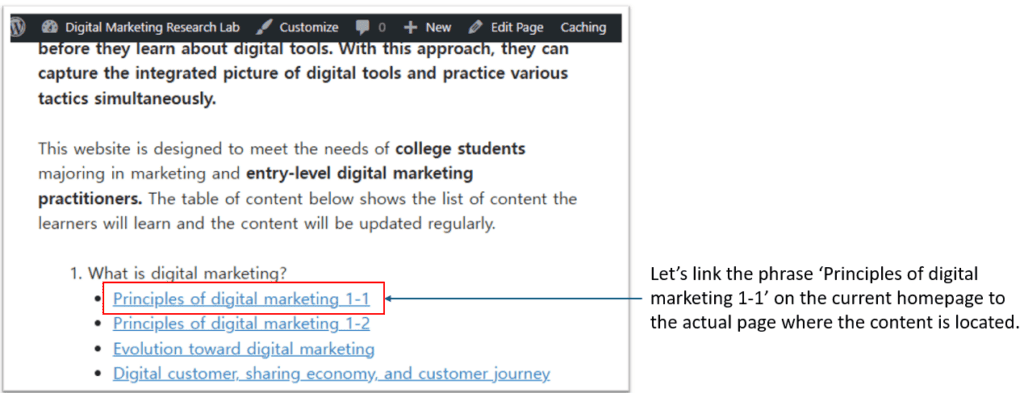
On the homepage, you can add internal links to guide readers to detailed content pages.
For example, let’s link the phrase “Principles of digital marketing 1-1” to the actual page where that content is located. By creating this link, users can click the text and be taken directly to the corresponding section of your website.
You can simply follow steps below.
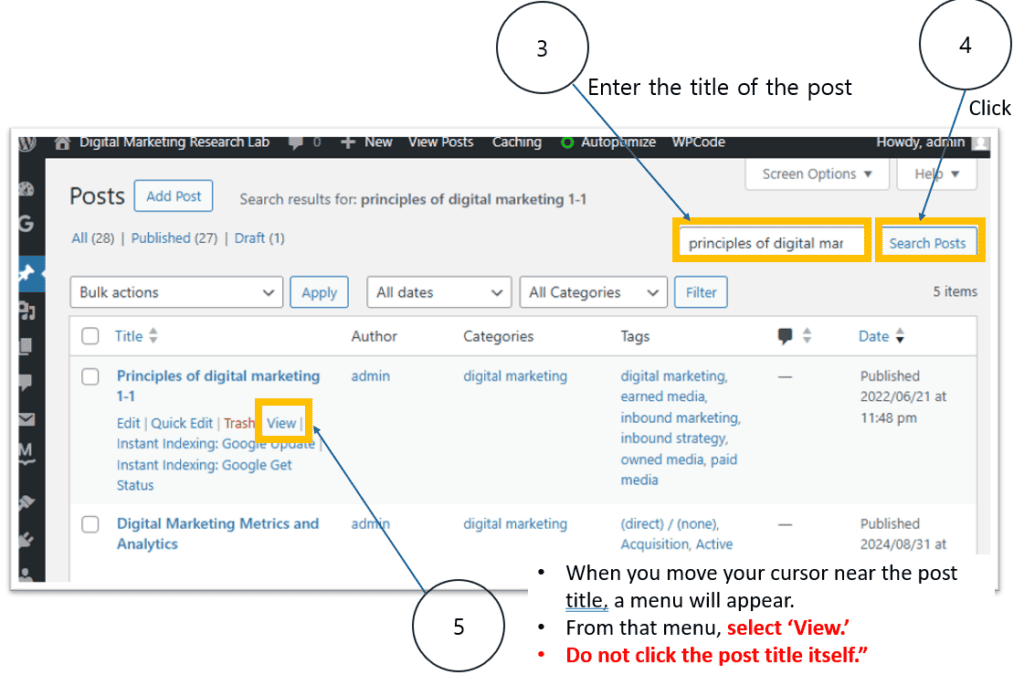
To find the post you want to link, enter the title of the post in the search bar and click “Search Posts.”
When the search results appear, move your cursor near the post title. A small menu will appear below the title. From that menu, select “View.” Do not click the post title itself—only click “View.”
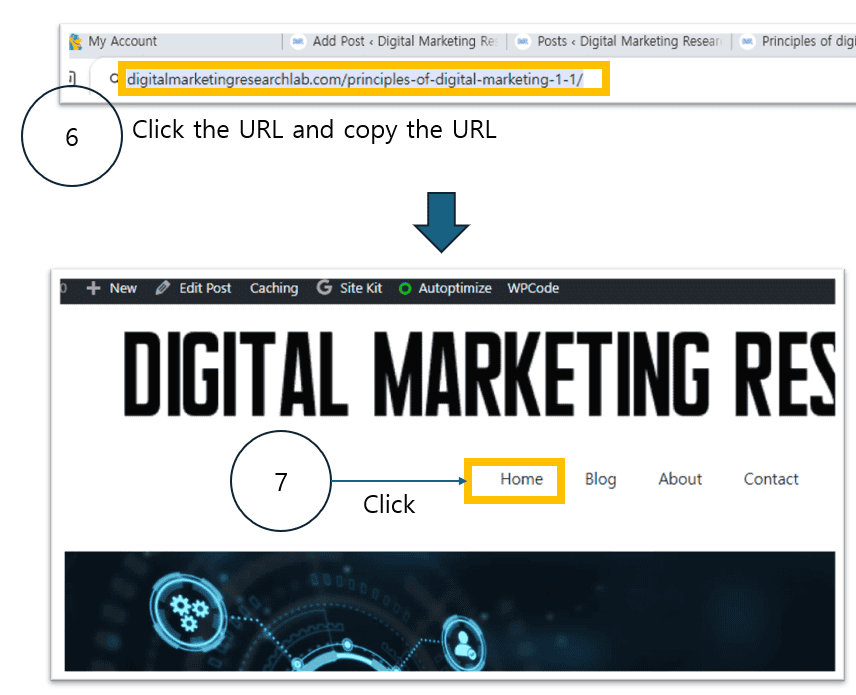
After opening the post, click the URL at the top of the page and copy it. Once you have copied the URL, return to the homepage by clicking “Home” in the site menu.
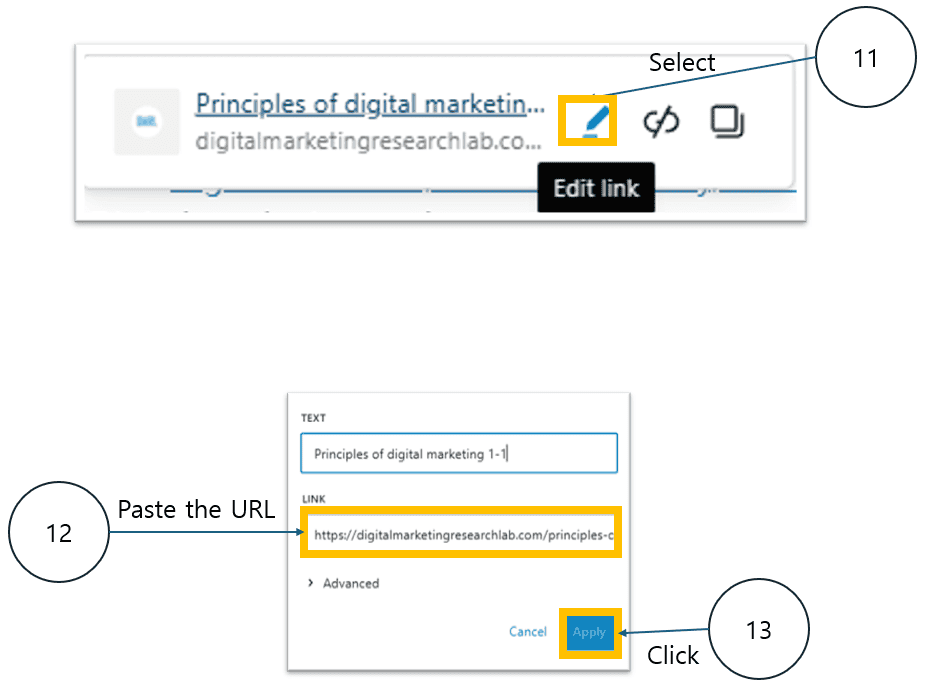
To add the link to your homepage, click “Edit Page” at the top of the screen. Next, highlight the text you want to link—in this case, “Principles of digital marketing 1-1.” Once the text is selected, click the link icon in the toolbar. This will allow you to insert the URL you copied earlier.
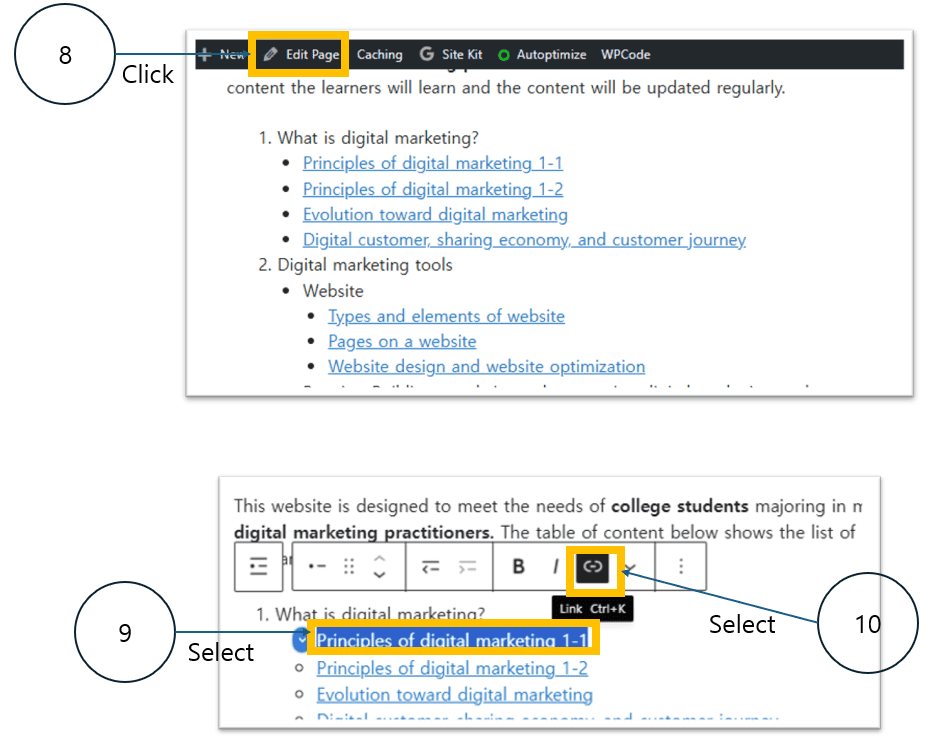
After selecting the text and opening the link options, click the Edit link icon. In the link field, paste the URL that you copied earlier. Once the URL is entered, click “Apply” to save the link. This will connect the selected text to the corresponding content page.
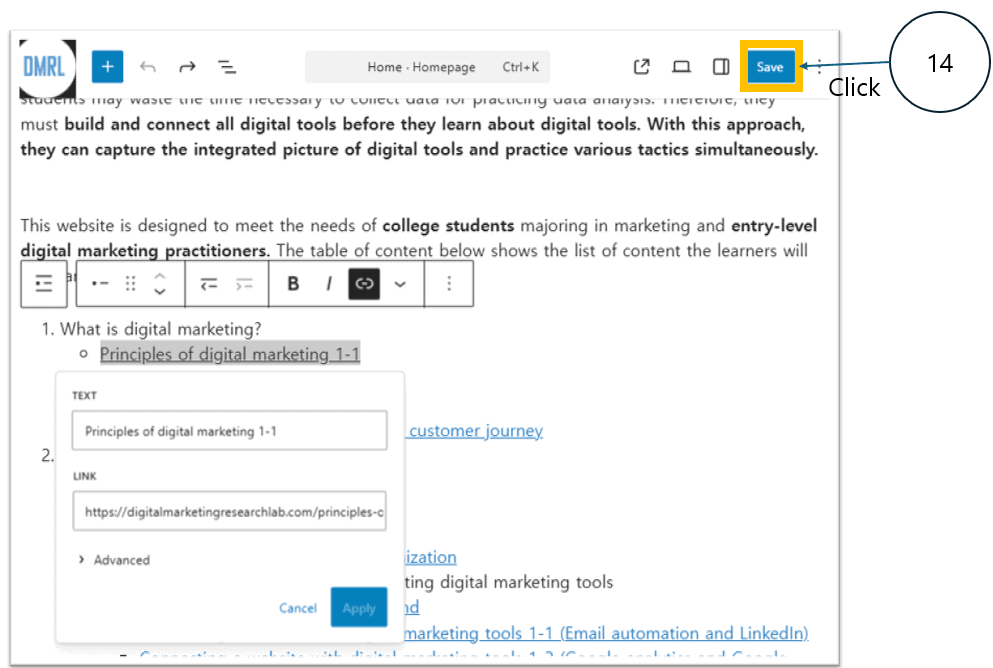
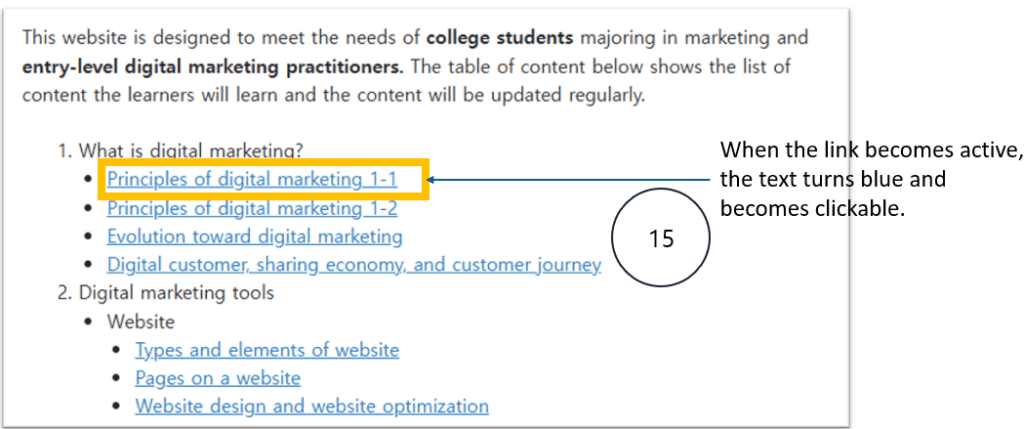
After pasting the link, click “Save” to update the page. Once the update is saved, the linked text will turn blue, indicating that the hyperlink is active and clickable. This confirms that the link has been successfully added to your homepage content.
Before you leave
Next time, you will connect your website with various digital marketing tools!
Before you leave, I would like you to create a personal LinkedIn account. This is because LinkedIn requires a personal account as a prerequisite for creating an organizational account.
After creating your personal account, please connect with at least 10 people on LinkedIn. There have been occasional reports that users could not create an organizational account if they did not meet this requirement.
Please refer to the video (https://youtu.be/hNzpEeU3a4I) below to create your personal LinkedIn account. This video reflects the latest 2025 interface, provides a step-by-step guide, and offers various helpful tips.